



LiteSpeed has no ACME client of its own, so certificates come from acme.sh, which issues them and then runs a reload command so the running server picks them up. This guide covers both editions, OpenLiteSpeed and LiteSpeed Enterprise, using a commercial certificate authority, which means registering the ACME account with External Account Binding credentials.
Under CA/Browser Forum ballot SC-081v3, publicly trusted TLS certificates have been capped at 200 days since March 15, 2026, dropping to 100 days on March 15, 2027 and to 47 days on March 15, 2029. The reload command in Step 5 is the part that decides whether that schedule is invisible or a recurring outage.
What you will need
- LiteSpeed Web Server installed, either OpenLiteSpeed or Enterprise. The commands differ between them in two places, both flagged below.
- SSH access with root or sudo.
- An A or AAAA record for the domain pointing at this server.
- Your CA’s ACME directory URL, EAB Key ID and EAB HMAC Key.
- Inbound port 80 open, because the HTTP-01 challenge is served over plain HTTP, and outbound HTTPS so the server can reach your CA.
Step 1: Install acme.sh
ssh [email protected]curl https://get.acme.sh | sh -s [email protected]
source ~/.bashrc
acme.sh --versionThe installer places the client in the home directory of the account you used and adds a daily cron entry, which is what drives renewals later. If the install fails, check that curl and git are present, and re-run it with --force if a previous attempt left it half-finished.
Step 2: Register the ACME account with EAB
acme.sh --register-account \
  --server https://acme.yourca.example/v2/DV \
  --eab-kid "YOUR_EAB_KEY_ID" \
  --eab-hmac-key "YOUR_EAB_HMAC_KEY" \
  --accountemail "[email protected]"
Once per certificate authority. If you have already registered with the same EAB pair, acme.sh reuses the existing account rather than failing. Paste the HMAC key exactly as the CA gave it, since it is already base64url encoded and re-encoding it causes a rejection that looks like wrong credentials. Pass --server on every later command too: acme.sh has defaulted to ZeroSSL since version 3.0.
Step 3: Prepare HTTP validation
The CA will fetch a file from http://example.com/.well-known/acme-challenge/, so the server has to serve that path over plain HTTP. Find your document root first, because getting it wrong is the most common cause of a failed issuance.
- OpenLiteSpeed, on a fresh install, serves from /usr/local/lsws/Example/html.
- LiteSpeed Enterprise with a control panel uses wherever the domain points, commonly /home/username/public_html.
Prove the path works before involving the CA. Substitute your own document root:
mkdir -p /path/to/webroot/.well-known/acme-challenge
echo "ok" > /path/to/webroot/.well-known/acme-challenge/testfile
curl -I http://example.com/.well-known/acme-challenge/testfile
A 200 means you are ready. Anything else is worth fixing now rather than debugging through acme.sh. More on the .well-known folder if the convention is new to you.
If the site forces HTTPS
A blanket redirect to HTTPS breaks validation unless the challenge path is exempted. In .htaccess in the document root:
RewriteEngine On
RewriteRule ^\.well-known/acme-challenge/ - [L]
RewriteCond %{HTTPS} !=on
RewriteRule ^ https://%{HTTP_HOST}%{REQUEST_URI} [L,R=301]
The flag on the exemption is [L], not the [END] that Apache material uses. LiteSpeed’s rewrite engine already stops processing rules altogether on [L], which is what [END] does on Apache, and [END] is not among the flags LiteSpeed documents. Note also that OpenLiteSpeed reads .htaccess only when rewrite handling is enabled for the virtual host, so if the file appears to have no effect, check that setting before rewriting the rule.
If port 80 is not answering
On OpenLiteSpeed, sign in to the WebAdmin console at https://your-server-address:7080 and open Listeners. A fresh install has a Default listener; confirm it is on port 80 with the IP set to ANY.
On Enterprise, check the same in WebAdmin or your hosting panel. If something else already holds the port, find it and stop it before restarting LiteSpeed:
sudo lsof -i :80Step 4: Issue the certificate
acme.sh --issue \
  -d example.com \
  -d www.example.com \
  -w /path/to/webroot \
  --server https://acme.yourca.example/v2/DV
Add a -d for each name you want on the certificate, and make sure -w is the document root you just tested. Note the double hyphens throughout: guides that render these as a single long dash are a common source of unrecognised-option errors.
If issuance fails with unauthorized, not delegated or an invalid response, the cause is almost always one of four things: DNS not yet pointing at this server, the wrong webroot, port 80 blocked or redirected, or a directory URL that does not match the product you bought.
Step 5: Install the files and set the reload command
acme.sh keeps working copies in its own directory and asks you not to point other software at them, because that layout is internal. Install to a stable path instead, and give acme.sh the command to run afterwards:
mkdir -p /usr/local/lsws/conf/cert/example.com

acme.sh --install-cert -d example.com \
  --key-file       /usr/local/lsws/conf/cert/example.com/example.com.key \
  --fullchain-file /usr/local/lsws/conf/cert/example.com/example.com.crt \
  --reloadcmd      "/usr/local/lsws/bin/lswsctrl reload"
On LiteSpeed Enterprise the reload command is different, so use this instead:
--reloadcmd "service lsws reload"This single step is what makes renewals work. acme.sh records both the destination paths and the reload command against the certificate and repeats them every time it renews, so nothing else needs scheduling.
Then set permissions on the private key:
chmod 600 /usr/local/lsws/conf/cert/example.com/example.com.key
chown root:root /usr/local/lsws/conf/cert/example.com/example.com.key
Keep the key owned by root. You will find guidance that hands the certificate directory to the account LiteSpeed’s workers run as, typically nobody, but that is worth resisting: on a server that also runs PHP or CGI as that account, the site’s own application code can then read the TLS private key. LiteSpeed reads its configuration and certificates before dropping to the worker account, so root ownership is both sufficient and safer. Only relax it if LiteSpeed genuinely cannot read the file, and then only as far as it needs. As a practical aside, nogroup exists on Debian-based systems but not on RHEL-based ones, so a copied nobody:nogroup command simply errors there.
Step 6: Point LiteSpeed at the certificate
OpenLiteSpeed
Log in to WebAdmin at https://your-server-address:7080 and create a secure listener under Listeners, then Add:
- Listener Name: HTTPS
- IP Address: ANY
- Port: 443
- Secure: Yes
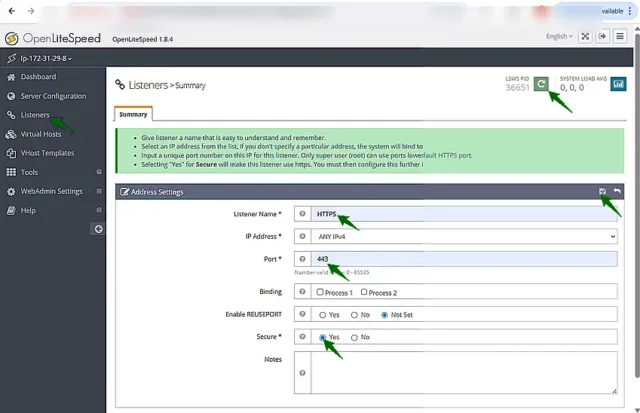
Save, then open the new listener and go to its SSL tab. Enter the paths you installed to in Step 5:
- Private Key File: /usr/local/lsws/conf/cert/example.com/example.com.key
- Certificate File: /usr/local/lsws/conf/cert/example.com/example.com.crt
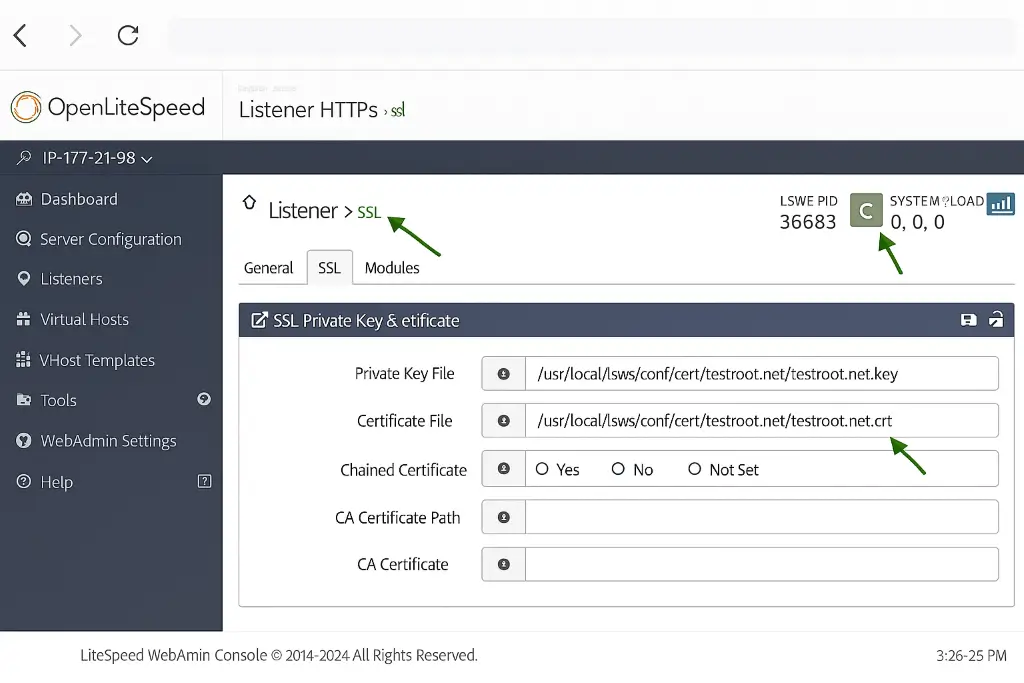
Because the file installed by acme.sh is a full chain, the intermediate certificates travel with the leaf and there is no separate chain field to fill in.
Still on the listener, open Virtual Host Mappings and map the virtual host to the domains it should answer for. On a default installation the virtual host is called Example; use your own name if you renamed it.
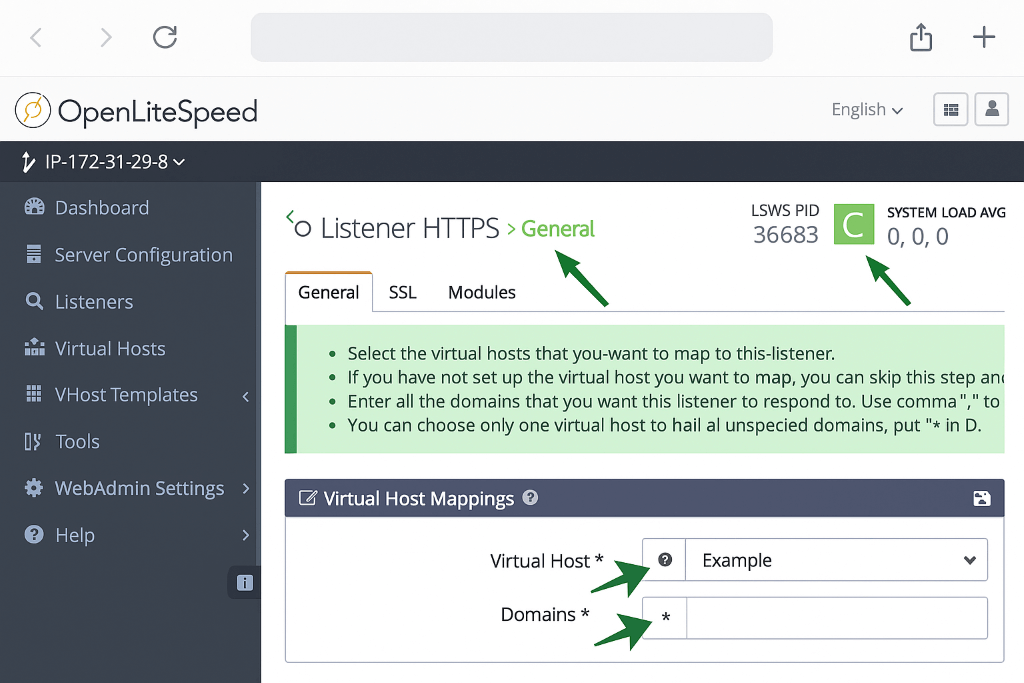
Apply everything with Actions, then Graceful Restart.
LiteSpeed Enterprise
The shape is the same but the entry point depends on how the server is managed. With a control panel such as cPanel, configure the certificate through the panel so it stays in step with the panel’s own records. Otherwise use WebAdmin and set the same two paths wherever the domain’s virtual host is defined. Then reload:
service lsws reloadStep 7: Verify and confirm renewal
Check what the server actually presents, from another machine:
openssl s_client -connect example.com:443 -servername example.com </dev/null 2>/dev/null | openssl x509 -noout -subject -issuer -datesConfirm the issuer is your CA and the dates are new. The SSL Checker reports the same from outside your network, including whether the intermediate is being served with the leaf.
Confirm the cron entry exists:
crontab -lYou should see a daily line calling acme.sh with --cron. On timing: acme.sh’s default is to renew 30 days after issuance, which is frequently described the other way round as 30 days before expiry. A negative value for --days is what expresses days before expiry, and where the CA publishes ACME Renewal Information, current acme.sh follows the window the CA suggests instead.
Test the whole path once, including the reload:
acme.sh --renew -d example.com --force
tail -n 40 ~/.acme.sh/acme.sh.log
This is a real renewal, not a simulation, so it consumes a certificate and counts against rate limits. Run it once. Then re-run the check above and confirm the dates moved.
Common problems
- 404 on the challenge file. The -w path is not the document root the site actually serves. Confirm the folder exists inside that root and that you can fetch the test file over plain HTTP from outside the server.
- Unauthorized or not delegated. Check the A or AAAA record points here, that the directory URL matches your product, and that the EAB credentials are the ones your CA issued for this account.
- The certificate renewed but the site serves the old one. The reload command did not run or was wrong for your edition. It is /usr/local/lsws/bin/lswsctrl reload on OpenLiteSpeed and service lsws reload on Enterprise, and re-running
--install-certwith the right--reloadcmdupdates it. - LiteSpeed will not start after the change. Usually the key file cannot be read, or the paths in the listener do not match where acme.sh installed. Check both against Step 5.
- The .htaccess exemption has no effect on OpenLiteSpeed. Rewrite handling has to be enabled for the virtual host before the file is read at all.
- You need more detail. Add
--debugto any acme.sh command, and read ~/.acme.sh/acme.sh.log.
For error strings that come from the ACME protocol rather than from acme.sh or LiteSpeed, such as badNonce, unauthorized or a CAA record refusing issuance, see our guide to fixing ACME SSL certificate errors.
Frequently Asked Questions
Two things, and only two. The reload command is lswsctrl reload on OpenLiteSpeed and service lsws reload on Enterprise, which matters because it goes into --reloadcmd and runs at every renewal. And Enterprise is often managed through a control panel, in which case configuring the certificate there keeps the panel’s records consistent. Issuance itself is identical.
No. Keep the private key owned by root with mode 600. Handing it to the worker account means any process running as that account, which on many servers includes PHP, can read your TLS private key. LiteSpeed reads its certificates before dropping privileges, so it does not need that access. Relax the permissions only if the server genuinely fails to read the file.
No, because --fullchain-file installs the leaf and the intermediates in one file, which is what the listener’s certificate field wants. If a checker reports an incomplete chain, the likely cause is that the listener is pointed at a leaf-only file rather than the full chain.
Yes, and you need it for a wildcard, which no CA validates over HTTP. Replace -w with a DNS provider hook such as --dns dns_cf and supply the provider’s API credential. Avoid acme.sh’s manual DNS mode for anything permanent, since it cannot renew without someone publishing a new record by hand each time.
The cron entry only runs acme.sh; whether anything happens depends on the schedule and on the reload command succeeding. Check ~/.acme.sh/acme.sh.log after a forced renewal, since a failing reload is logged there and is the usual reason a renewed certificate never reaches the running server.
For more on the protocol behind all of this, see what the ACME protocol is and our ACME SSL certificates page. To install a certificate on LiteSpeed by hand instead, see our guides to generating a CSR on LiteSpeed and installing an SSL certificate on LiteSpeed.
Save 10% on SSL Certificates when ordering from SSL Dragon today!
Fast issuance, strong encryption, 99.99% browser trust, dedicated support, and 25-day money-back guarantee. Coupon code: SAVE10


