



OPNsense issues and renews its own TLS certificates through the os-acme-client plugin, a graphical front end to the acme.sh client. This guide covers the case most administrators face when the certificate is not a free one: issuing from a commercial certificate authority, which means registering the ACME account with External Account Binding credentials, a key identifier and an HMAC key that your CA generates for you.
The reason to automate this has changed since these certificates were something you replaced once a year. Under CA/Browser Forum ballot SC-081v3, publicly trusted TLS certificates have been capped at 200 days since March 15, 2026, dropping to 100 days on March 15, 2027 and to 47 days on March 15, 2029. On a firewall that fronts a VPN portal, a reverse proxy and a management interface, doing that by hand stops being realistic quite quickly.
What you will need
- Administrator access to the OPNsense web interface. Everything on this page is done in the GUI.
- A domain name you control, with a DNS record for the name that will go on the certificate.
- Your CA’s ACME directory URL, for example the Sectigo endpoint in the form https://acme.sectigo.com/v2/DV.
- EAB credentials from that CA, a Key Identifier and an HMAC Key, generated in your CA account portal.
- One reachable validation path. Either the ability to publish DNS TXT records, which is what DNS-01 needs and what the plugin selects by default, or inbound TCP port 80 from the internet for HTTP-01. You do not need both, and you do not need port 80 at all if you use DNS.
Step 1: Install and enable the ACME plugin
- Log in to the OPNsense web interface as an administrator.
- Go to System > Firmware > Plugins.
- Find os-acme-client in the list and click the + button at the right of its row to install it.
- Refresh the page once the installation finishes, so the new menu entry appears.
- Go to Services > ACME Client > Settings, tick Enable Plugin, and save the page.
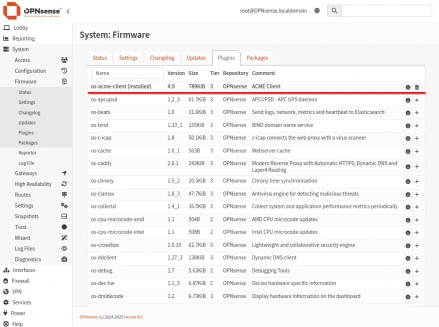
The plugin ships disabled, so this step is not optional: none of the pages below will do anything until it is enabled. Leave Auto Renewal ticked while you are here. It adds the cron job that later checks your certificates on a schedule, and without it nothing renews on its own.
Once enabled, the plugin adds six pages under Services > ACME Client: Settings, Accounts, Challenge Types, Certificates, Automations and Log Files. The order matters, because a certificate cannot be saved until the account, the challenge type and, ideally, the automation already exist.
Step 2: Add and register the ACME account
Go to Services > ACME Client > Accounts and click + Add. The dialog carries a warning header that is easy to scroll past and expensive to ignore: the settings below it must not be changed after the account is registered. If you get the CA URL or the EAB credentials wrong, create a new account rather than editing this one.
- Enabled: leave ticked.
- Name: anything that identifies the account to you, such as the CA’s name.
- Description: optional free text.
- E-Mail Address: optional, and it is a contact address for the account rather than a notification service you should rely on.
- ACME CA: choose Custom CA URL. The dropdown also lists Let’s Encrypt, Buypass, Google, SSL.com and ZeroSSL along with their test endpoints, but a commercial CA that hands you a directory URL belongs under the custom option.
- Custom CA URL: paste the directory URL exactly as your CA gave it.
- Key Identifier: your EAB key ID.
- HMAC Key: your EAB HMAC key. The field is masked, so paste carefully and check for a leading or trailing space, which is the most common cause of a rejected registration.
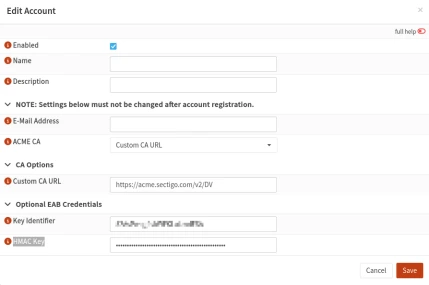
Click Save, then use the Register action on the account row. Registration is a separate step from saving, and until it succeeds no certificate attached to this account can be issued. Both EAB fields are optional in the form itself, because certificate authorities that do not use External Account Binding leave them empty, so a blank pair will not stop you from saving an account that is not going to work.
Step 3: Add a challenge type
Go to Services > ACME Client > Challenge Types and click + Add. Give it a name, then pick the method in the Challenge Type dropdown. The plugin offers three, and it is worth knowing all of them because a lot of OPNsense material claims only the first one exists.
- DNS-01 is the plugin’s own default. You pick your DNS provider from a list of roughly 120 integrations, from Cloudflare and Route 53 to Hetzner, deSEC and cPanel, supply an API credential, and the plugin publishes and removes the TXT record itself. Nothing has to be reachable from the internet, so this is the method for a firewall behind CGNAT, on a dynamic address, or where the ISP blocks port 80. It is also the only method that can issue a wildcard.
- HTTP-01 validates over port 80. Under HTTP Service you choose either OPNsense Web Service (automatic port forward), which is the default, or HAProxy HTTP Frontend Integration if you already run the HAProxy plugin.
- TLS-ALPN-01 validates over port 443, which suits a setup where port 80 is closed but 443 is open.
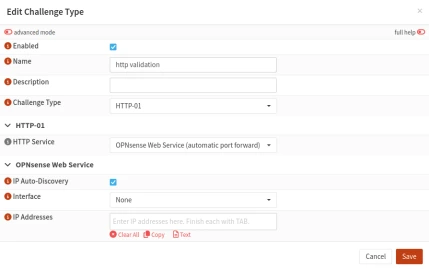
If you choose HTTP-01 with the default service, understand what “automatic port forward” means, because it changes what you have to configure yourself. The plugin does not bind its challenge listener to port 80 directly. It runs the listener on port 43580 and creates a port forward from 80 to it while validation is in progress, with the TLS-ALPN listener on 43581 under the same arrangement. Your job is to make sure inbound port 80 reaches the firewall from the internet in the first place, through a firewall rule and, if the OPNsense box is not the edge device, whatever sits in front of it. The IP Auto-Discovery, Interface and IP Addresses fields in the same dialog control which addresses that forward is created for.
Save the challenge type when you are done.
Step 4: Add an automation, before you issue anything
This is the step that separates a certificate that keeps working from one that quietly breaks in two months, and it is the step most OPNsense ACME walkthroughs leave out entirely. Issuing a certificate writes new files. It does not tell the services holding the old certificate in memory to pick them up. The plugin’s own help text on the field says so plainly: if you do not configure an automation, the in-memory certificate may expire and cause security warnings and other issues.
Go to Services > ACME Client > Automations and click + Add. Give it a name and choose a type. The list covers eighteen actions, and these are the ones that matter on most firewalls:
- Restart OPNsense Web UI, which is what you need if this certificate secures the management interface.
- Restart HAProxy, Restart Nginx or Reload Caddy for the corresponding reverse-proxy plugins.
- System or Plugin Command, a generic action for anything else running on the box, such as restarting OpenVPN or an IPsec daemon.
- Remote Command via SSH and Upload certificate via SFTP, for pushing the certificate to a machine that is not the firewall.
- Ready-made uploads for other devices, including Synology DSM, TrueNAS, Proxmox VE, Proxmox Backup Server, HashiCorp Vault, Palo Alto Networks firewalls, Ruckus controllers, Zyxel GS1900 switches, UniFi and FRITZ!Box.
You can create several and attach all of them to one certificate. Save the automation, and note that it does nothing on its own: it only runs when a certificate references it, which happens in the next step.
Step 5: Create and issue the certificate
Go to Services > ACME Client > Certificates and click + Add.
- Common Name: the primary hostname, for example fw.example.com. This becomes both the CN and the first subject alternative name.
- Alt Names: any additional hostnames. Type each one and press Tab to commit it. If you change this field after the certificate has already been signed, you have to force a re-issue with the issue button in the Commands column; a normal renewal will not pick the change up.
- ACME Account: the account from Step 2.
- Challenge Type: the entry from Step 3.
- Auto Renewal: leave ticked. When it is off, the cron job skips this certificate entirely, though you can still renew it by hand from this page.
- Renewal Interval: 60 days by default. Read Step 7 before changing it or leaving it.
- Key Length: 4096-bit RSA by default, with 2048, 3072, ec-256 and ec-384 also available.
- OCSP Must Staple: leave off unless you know your CA supports it. The dialog carries its own note that not all CAs do, and issuance fails outright when they do not.
- Certificate Profile: optional, and only if your CA publishes profile names.
- Automations: select the automation you created in Step 4. This is the field the previous step exists for.
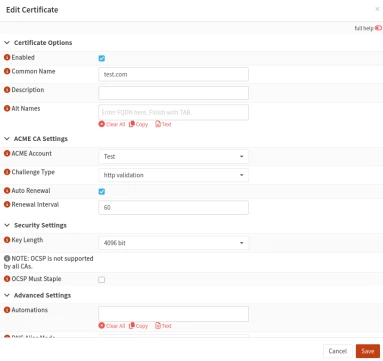
Save, then use the issue button in the Commands column of the certificate’s row. Validation and issuance run in the background and can take anything from a few seconds to a couple of minutes, longer with DNS-01 because the plugin waits for the TXT record to propagate. The status column on the same page reports the outcome.
Step 6: Point the web interface at the new certificate
An issued certificate is stored in the firewall’s trust store and used by nothing. To put it in front of the management interface, go to System > Settings > Administration, make sure the protocol is set to HTTPS, and pick the new certificate in the SSL Certificate dropdown. Save, and the interface restarts on the new certificate.
If OPNsense refuses the selection and tells you the certificate is not intended for server use, the certificate was issued for a different purpose. A DV or OV certificate from a public CA will carry TLS Web Server Authentication and be accepted.
Other consumers are configured in their own places, not centrally: OpenVPN in the server instance, IPsec in the tunnel configuration, HAProxy in the frontend. System > Trust > Certificates is not where you assign anything. That page lists your certificates and shows an In use indicator, which is read-only information about where a certificate is already referenced, not a control for attaching it to a service.
Confirm what the firewall is actually serving from another machine on the network. This prints the certificate the management interface presents, so you can check the dates and the issuer against what you just issued:
openssl s_client -connect fw.example.com:443 </dev/null 2>/dev/null | openssl x509 -noout -subject -issuer -datesFor a check from outside your network, including whether the intermediate certificate is being served correctly, use the SSL Checker.
Step 7: Check the renewal interval against the certificate lifetime
Renewal is handled by the cron job that Auto Renewal installed in Step 1. What that job checks is worth understanding exactly, because the field name suggests something slightly different from what it does.
Renewal Interval counts days since the certificate was last issued, not days before it expires. The plugin takes the timestamp of the last update, adds the interval, and renews once that date has passed. It never looks at the certificate’s own expiry date. At the default of 60 days against today’s 200-day maximum lifetime there is a comfortable margin, so most installations can leave it alone.
Two situations break that assumption, and both are arriving rather than hypothetical. If you set a Certificate Profile that issues short-lived certificates, the certificate can expire long before a 60-day interval comes round. And when the industry cap falls to 47 days in March 2029, a 60-day interval will be longer than the certificate lives. The rule to apply in either case is simple: keep the interval comfortably below the certificate’s lifetime, roughly two thirds of it, and re-check the setting whenever the lifetime changes.
When issuance or renewal fails
Start at Services > ACME Client > Log Files, which gives you both the plugin’s system log and the acme.sh log. The acme.sh log carries the CA’s own error text, which is what you need for anything the certificate authority rejected rather than anything OPNsense did wrong. Raising Log Level in the plugin settings adds detail when the default is not enough.
- The account will not register. Re-copy the key identifier and HMAC key, checking for whitespace at either end. If the CA URL or the credentials were wrong on a registered account, delete the account and create a new one rather than editing it.
- HTTP-01 validation times out. Confirm port 80 reaches the firewall from the internet, that a firewall rule allows it, and that nothing else already answers on port 80 on that address. If none of that can be arranged, switch the certificate to a DNS-01 challenge type instead of fighting it.
- DNS-01 fails on the TXT record. Check the API credential and its permissions at the DNS provider, then confirm the record appears publicly before concluding the plugin is at fault. The debug 2 and debug 3 log levels are the ones that expose messages from the DNS provider scripts themselves, which is where the real error usually is.
- Issuance fails only when OCSP Must Staple is on. Turn it off. Not every CA supports the extension, and the plugin flags this as the likely cause.
- Everything succeeds but the browser still shows the old certificate. That is the automation, not the certificate. See the FAQ below.
- You want to test without burning CA rate limits. Set the plugin’s environment to the staging option and use a test CA endpoint while you get the configuration right, then switch back to production.
For error strings that come from the ACME protocol itself rather than from OPNsense, such as badNonce, unauthorized, or a CAA record refusing issuance, see our guide to fixing ACME SSL certificate errors.
Frequently Asked Questions
It supports all three standard challenge types, HTTP-01, DNS-01 and TLS-ALPN-01, and DNS-01 is the option the plugin selects by default. It ships with roughly 120 DNS provider integrations, so for most hosted domains you supply an API credential and the plugin manages the TXT record itself. The claim that DNS validation needs third-party scripts or external automation on OPNsense is simply out of date.
Each service is configured in its own page. The management interface takes its certificate from the SSL Certificate dropdown at System > Settings > Administration; OpenVPN from the server instance; HAProxy from the frontend. System > Trust > Certificates is a certificate list with a read-only In use indicator, so there is nothing to assign from there.
Nothing restarted the service holding it. Renewal writes new files; the running daemon keeps serving the certificate it loaded at start-up until it is restarted or reloaded. Add an automation such as Restart OPNsense Web UI under Services > ACME Client > Automations and attach it to the certificate in the Automations field. This is also why the symptom typically appears weeks after a setup that seemed to work: the first issuance was followed by a manual restart, and the first automatic renewal was not.
Only for HTTP-01, and not for DNS-01 or TLS-ALPN-01. When you do use HTTP-01 with the default service, the plugin listens on port 43580 and creates a port forward from 80 to it during validation, so what you need to arrange is that inbound port 80 reaches the firewall at all. If your ISP blocks port 80, or the firewall sits behind CGNAT, use DNS-01 instead.
For more on the protocol behind all of this, see what the ACME protocol is and our ACME SSL certificates page. A pfSense box is secured in much the same way, through its own ACME package rather than this plugin, covered in our guide to installing an ACME SSL certificate on pfSense.
Save 10% on SSL Certificates when ordering from SSL Dragon today!
Fast issuance, strong encryption, 99.99% browser trust, dedicated support, and 25-day money-back guarantee. Coupon code: SAVE10


