If you develop or distribute software for Windows, understanding how to sign an EXE file ensures your applications are trusted and free from security warnings. Code signing verifies the authenticity and integrity of an executable, assuring users that the software is from a legitimate source and has not been tampered with. Without a valid digital signature, Windows may block the application or display security alerts, making it difficult to gain user trust.
This article explains how to sign an executable, covering everything from requirements and step-by-step instructions to verification and the benefits of signing an EXE file.
By the end of this guide, you’ll know how to obtain and install a code-signing certificate, use Microsoft’s signtool.exe to sign an EXE file, and verify that your executable is correctly signed. Let’s get started.
Requirements Before Signing an EXE or Application
Before signing an EXE file, you must have the right tools and setup. Code signing isn’t just about applying a digital signature. It requires a valid certificate, secure key storage, and proper signing software. Below, we’ll go through the key requirements step by step, covering everything from choosing the right certificate to setting up the necessary software.
1. Get a Code Signing Certificate
First, you need a code signing certificate issued by a trusted Certificate Authority (CA) like DigiCert or Sectigo. This certificate verifies your identity as a software publisher.
Since June 1, 2023, all code signing certificates must store the private key on secure hardware. As a result, you cannot generate or keep the private key on your local computer. Instead, it must be stored on a FIPS 140-2 Level 2+ approved device, such as a SafeNet USB token or a Hardware Security Module (HSM).
DigiCert and GoGetSSL code signing certificates are issued for one year, regardless of whether you use a hardware token provided by the CA or your own supported hardware device. Sectigo/Comodo certificates follow a different model, allowing multi-year plans (up to three years) only when using your own hardware module.
The type of certificate you choose affects how you handle key storage:
- EV Code Signing Certificates always come with a SafeNet USB token issued by the CA. This physical device holds your private key and is required every time you sign an EXE file.
- Standard Code Signing Certificates do not include a USB token. Instead, you can either use a cloud-based signing service (such as DigiCert’s KeyLocker) or store the private key on your own HSM if your CA allows it.
2. Set Up Your Signing Environment
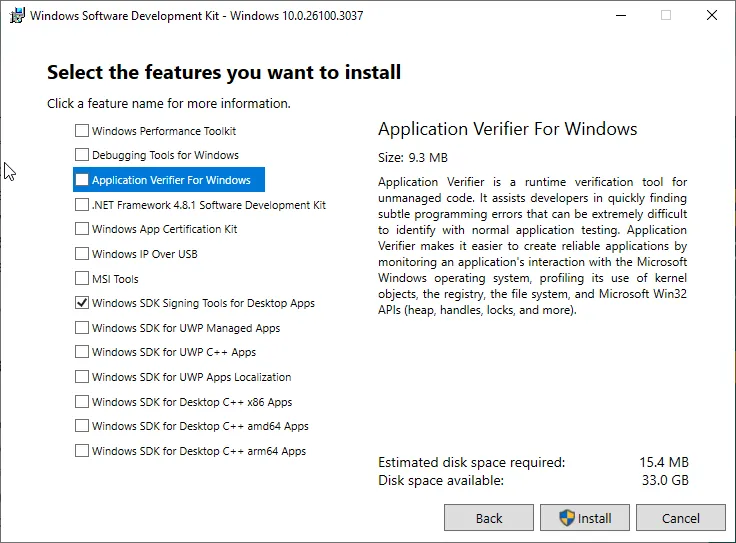
Once you have your certificate and secure storage device, you need the right tools. Windows SDK (Software Development Kit) includes the necessary signing utility, signtool.exe, which you’ll use to apply the digital signature. If it’s not already installed, you can download the latest version from Microsoft’s official website.
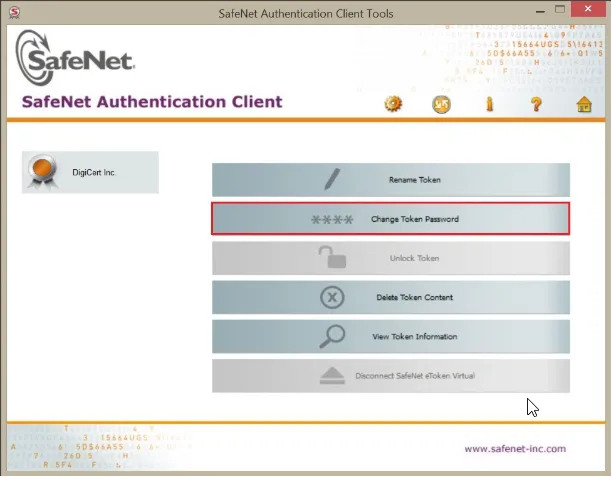
If you are using an EV Code Signing certificate, you’ll also need to install the SafeNet Authentication Client software. This allows your system to communicate with the USB token and retrieve the private key securely. If you’re signing with an HSM, ensure the device is appropriately set up and that your certificate is accessible from your signing environment.
You must also have administrator privileges on your computer. Code signing requires elevated permissions, so run Command Prompt or PowerShell as an administrator before executing any signing commands.
3. Why Timestamping is Important
A key part of the signing process is timestamping, which ensures that your digital signature remains valid even after your certificate expires. Without a timestamp, Windows will treat your signed EXE as untrusted once the certificate reaches its expiration date.
When you sign your file, the signing tool contacts a timestamping server, which records the exact date and time of signing. This proves that your file was signed while the certificate was still valid. Most CAs provide timestamping services for free. If you don’t add a timestamp, users will see warnings about an expired signature, making your application appear unsafe.
4. Final Preparations Before Signing
Before you sign your EXE, double-check that your signing tools, drivers, and secure storage device are set up correctly. If using an HSM, verify the key is accessible and properly configured. If you’re using a SafeNet USB token, ensure it’s plugged in and the SafeNet Authentication Client is running.
With everything in place, you’re ready to sign your EXE file. The process might seem complex initially, but following these steps ensure your software is trusted by Windows, prevents security warnings, and reassures users that your application is safe to install.
Step-by-Step Guide to Signing an EXE File
Below is a detailed, up-to-date guide on signing an EXE, which must now be stored on a hardware security module (HSM) or USB token for enhanced security.
Step 1: Insert Your HSM or USB Token
Before you can sign an EXE, you must connect the hardware token or HSM that contains your code signing certificate and private key. Certification Authorities now require all code signing certificates to be stored on FIPS 140-2 Level 2-approved devices, such as a SafeNet USB token or YubiKey HSM.
Steps to connect your hardware token:
- Plug the HSM or USB token into your Windows machine.
- If prompted, install the necessary drivers (most devices install automatically).
- Ensure you have the SafeNet Authentication Client or any required HSM software installed.
If you use a cloud-based HSM (such as Azure Key Vault or AWS CloudHSM), ensure your credentials are set up correctly before proceeding.
Step 2: Open Command Prompt as Administrator
Since signing requires system permissions, you must use Command Prompt (cmd.exe) or PowerShell with administrative rights.
Steps to open Command Prompt as Administrator:
- Click the Start menu and type cmd.
- Right-click on Command Prompt and select Run as administrator.
Alternatively, if you prefer PowerShell, follow the same steps but type PowerShell instead.
Step 3: Locate SignTool
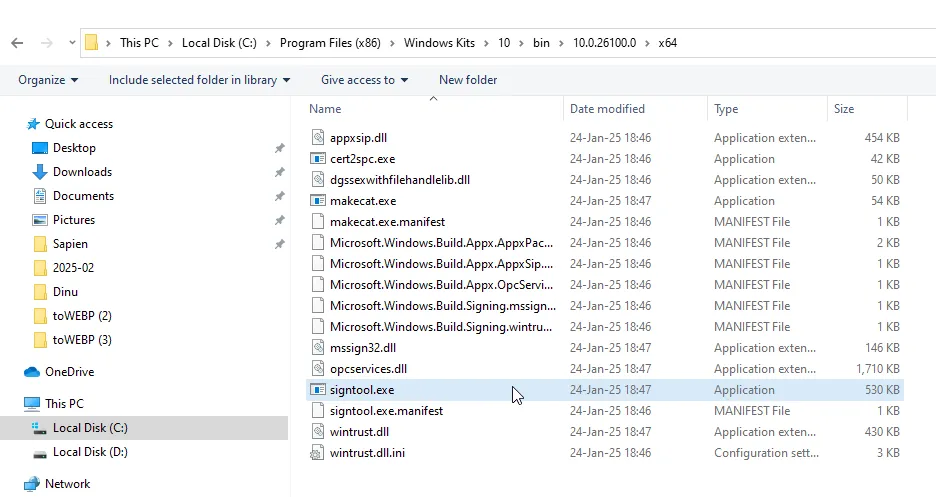
SignTool is a Microsoft utility included in the Windows SDK, which is required for signing executables.
Finding SignTool on your system:
The location of SignTool depends on your installed Windows SDK version. You can find it in:
C:\Program Files (x86)\Windows
Kits\10\bin\10.0.22621.0\x64\signtool.exe
Replace 10.0.22621.0 with your installed SDK version if needed.
Step 4: Sign the EXE Using SignTool
Now that everything is set up, you can sign your EXE file using SignTool. Below is an example of the correct command for signing with a timestamp. Adjust accordingly.
signtool sign /tr http://timestamp.digicert.com /td SHA256 /fd SHA256 /a "C:\path\to\yourfile.exe"
Explanation of the command:
- /tr http://timestamp.digicert.com – Specifies the RFC 3161 timestamp server URL (replace with your CA’s server).
- /td SHA256 – Sets SHA-256 as the timestamp digest algorithm.
- /fd SHA256 – Specifies SHA-256 as the file digest algorithm (modern Windows versions require this).
- /a – Automatically selects the correct code signing certificate.
- “C:\path\to\yourfile.exe” – Replace with the actual path of your EXE file.
Step 5: Enter the Password (If Required)
If your HSM or USB token requires authentication, a pop-up window will appear asking for your password or PIN.
What to do next:
- Enter the password for your SafeNet token (or any other HSM).
- If you have multiple certificates, SignTool may ask you to select the correct one.
Note: If using a cloud-based HSM, you may need to authenticate via API credentials or a secure PIN instead.
Verify the Signed EXE File
After signing your EXE, confirm that the signature is properly applied and includes a timestamp. Here’s how you can verify it:
1. Check File Properties
- Locate the signed EXE file on your computer.
- Right-click the file and select Properties.
- Go to the Digital Signatures tab.
- If the signing was successful, you’ll see the signature listed along with a timestamp. Click Details to confirm that the message says This digital signature is OK.
2. Use Poweshell for Verification
For a deeper check, you can use Windows Powershell.
- Open PowerShell (Win + X → PowerShell).
- Run the command:
Get-AuthenticodeSignature "C:\Windows\System32\cmd.exe"
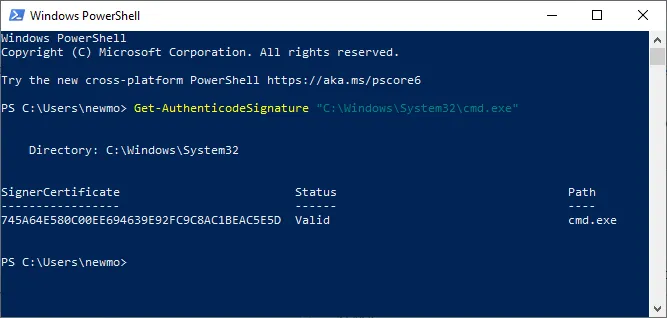
Replace “cmd/exe” with your exe file.
This will display details about the signature, including the certificate chain and timestamp. If the signature is invalid or missing, Windows will flag it.
3. Test on Another System
For added assurance, try downloading and running the signed EXE on a different computer. If everything is correct, Windows should recognize it as a trusted application without showing security warnings. By following these steps, you can ensure your EXE is correctly signed and ready for safe distribution.
Why Should You Sign an EXE File?
Windows application signing isn’t just about security—it’s about trust, protection, and ensuring your software runs smoothly. Here are a few reasons to sign an executable file:
- Users trust signed software. When an EXE file isn’t signed, Windows throws security warnings, and some systems may block it completely. A verified signature from a trusted Certificate Authority reassures users that the file is safe and hasn’t been tampered with.
- It prevents unauthorized modifications. Once signed, an EXE acts like a sealed package. If someone tries to alter it, whether to inject malware or modify the code, the signature breaks, and Windows marks the file as untrusted.
- It reduces Microsoft SmartScreen warnings. SmartScreen is aggressive with unsigned software, showing warnings that make users hesitant to install. Signing your EXE, especially with an Extended Validation (EV) Code Signing certificate, significantly lowers these warnings and makes installations smoother.
- It’s essential for enterprise distribution. Many corporate environments block unsigned software from running on their networks. A signed EXE meets security policies, ensuring it can be deployed without issues.
- Timestamping keeps the signature valid. Without a timestamp, a signature becomes invalid the moment the certificate expires. With a timestamp, the signature remains valid even after expiration, ensuring your software continues to work.
Sign Your EXE with Confidence – Get a Code Signing Certificate
Once you know how to sign an exe file and protect your software from security warnings, the next step is getting the proper Code Signing certificate. Whether you’re an independent developer or a business, signing your EXE ensures trust, smooth installations, and protection against tampering. Without a valid signature, Windows will flag your software, making it harder for users to install and run it.
At SSL Dragon, we offer OV and EV Code Signing Certificates from top providers like DigiCert, Sectigo, and GoGetSSL. Need a simple solution? Go for individual or organization validation. Want a stronger reputation and fewer SmartScreen warnings? Extended Validation is the way to go. Take your pick, sign your software confidently, and make security warnings a thing of the past.
Save 10% on SSL Certificates when ordering from SSL Dragon today!
Fast issuance, strong encryption, 99.99% browser trust, dedicated support, and 25-day money-back guarantee. Coupon code: SAVE10