
Have you ever wondered how your online data stays secure? Discover private keys, the essential data encryption elements in protocols like SSL and TLS. These complex character strings unlock encrypted data, ensuring only the intended recipient can access your sensitive details.
But what is an SSL private key? How does it look? And how to generate a private key for an SSL certificate? This article offers the answers to all these questions.
Table of Contents
- What Is a Private Key in SSL?
- What Does the Private Key Look Like?
- How to Generate a Private Key for an SSL Certificate?
- How to Get the Private Key from a Certificate?

What Is a Private Key in SSL?
A private key, an essential element in public key cryptography, is a complex alphanumeric code to secure digital communication on the web. It ranges from 256 to 2048 bits, protecting SSL certificates. Stored in a .key file on the web server, it works with the public key, facilitating secure data transmission.
The SSL certificate, issued by a trusted Certificate Authority, acts as a digital ID, validating website authenticity and encrypting data during transmission to prevent cyber threats. SSL/TLS protocols commonly use the RSA (Rivest–Shamir–Adleman) algorithm for encryption.
The RSA key pair consists of a public key and a private key. The public key encrypts data during transmission, while the corresponding RSA private key, securely stored on the server, decrypts it.
This asymmetric encryption, facilitated by the RSA key pair, ensures a secure communication channel, allowing only the entity with the private key to decrypt information in transit.
What Does the Private Key Look Like?
The length of the key depends on the cryptographic algorithm used. For example, private keys for the widely used RSA algorithm are typically 2048 or 4096 bits long. Other algorithms, such as ECC (Elliptic Curve Cryptography), may have shorter key lengths for equivalent security.
Here’s an example of what a private key might look like:
—–BEGIN RSA PRIVATE KEY—–
MIIEpAIBAAKCAQEAx5lcFmSLp6GEC7lV9h… …czPnGrH1N4HRMCY5OZEsAgMBAAECgYEA lMajvH8bdLNydo/IvBXni+zr+3pC0l7P… …yObyahQtrpfb2VzLN6+10jU4+8bAQ==
—–END RSA PRIVATE KEY—–
Please note, that this is just a representation, and the actual private key is the long sequence of characters between the BEGIN and END markers.
How to Generate a Private Key for an SSL Certificate?
When you request an SSL certificate from a CA, you must first generate a Certificate Signing Request (CSR) code and send it to the certificate authority for validation. The CSR is a small block of encoded text with the public key and contact data about your organization.
During CSR code generation, the system, whether server-specific, OpenSSL, or a CSR generator tool, creates the private key associated with your SSL cert and keeps it on your web server or the local computer where you generated the CSR code.
Some servers may require you to merge or concatenate your SSL certificates and private keys in a single file to complete SSL installation. Other systems, however, will automatically place the private key in the correct directory without any intervention from your part.
How to Get the Private Key from a Certificate?
Extracting a private key from a certificate can be necessary for various reasons, particularly during SSL installation. Whether you’re using Linux, Windows, Mac OS X, Tomcat or cPanel, there are specific steps to follow.
For instance, your main Apache configuration file, whether it’s named httpd.conf or apache2.conf, will typically include directives related to SSL/TLS configuration. The SSLCertificateKeyFile directive within this file specifies the path to the SSL private key file, not the directory. It points to the specific file where your private key is stored
Here’s how to find the private key of a certificate on different operating systems and control panels:
Linux Operating Systems (Apache, Nginx, Lighttpd, Heroku)
Obtaining your private key from a certificate on Linux-based operating systems like Apache, Nginx, Lighttpd, or Heroku requires you to access the server through the terminal.
Follow the steps below:
- Access your server using SSH (Secure Shell) through the terminal.
- Use the cd command to navigate to the directory where your SSL/TLS certificate files are stored. Typically, certificates reside in a location like /etc/ssl/ or /etc/nginx/ssl/.
- Use the openssl command to extract the private key from the certificate. The specific command depends on the format of your certificate. For PEM-encoded certificates, you might use:
openssl rsa -in your_certificate.pem -out private_key.pem - Replace your_certificate.pem with the actual filename of your certificate.
- Once extracted, make sure to handle the private key with care. It’s crucial to restrict access to this file to prevent unauthorized users from obtaining it. Set proper file permissions:
chmod 600 private_key.pem - After making changes, restart your web server (e.g., Apache, Nginx, Lighttpd) to apply the new SSL/TLS configuration:
udo service apache2 restart # for Apache
sudo service nginx restart # for Nginx
sudo service lighttpd restart # for Lighttpd
Note: These steps may vary slightly based on your specific Linux distribution and web server configuration. Always refer to the documentation relevant to your setup for the most accurate instructions.
Windows Operating Systems (IIS, Exchange, Small Business Server)
Shifting our focus from Linux to Windows operating systems like IIS, Exchange, and Small Business Server, start by opening the Microsoft Management Console (MMC) and adding the Certificates snap-in. Follow the steps:
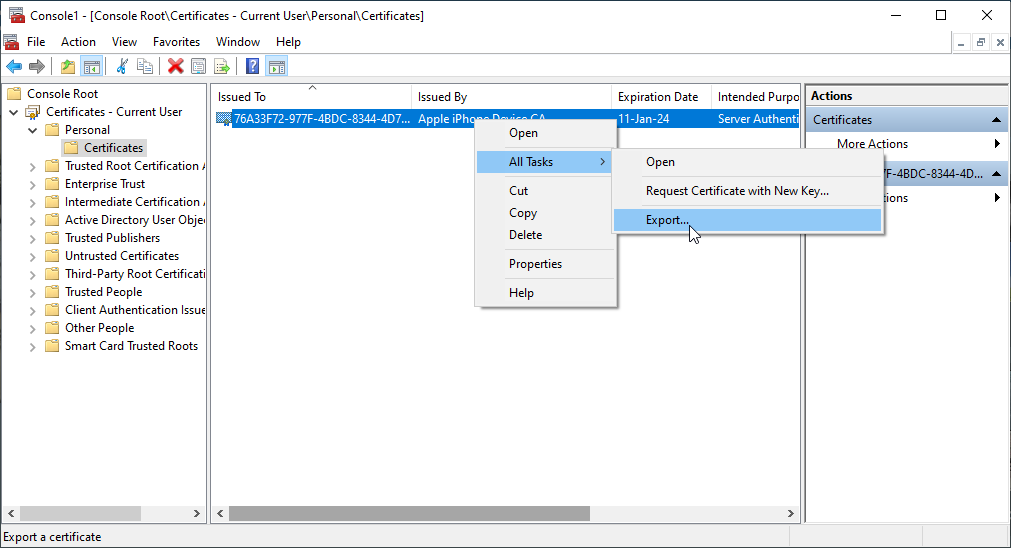
- Open the Microsoft Management Console (MMC).
- Add the Certificates snap-in.
- Navigate to Personal and then Certificates.
- Right-click the target certificate.
- Select All Tasks, then choose Export.
- In the Export Wizard, choose Yes, export the private key.
- Ensure Include all certificates in the certification path if possible is checked.
- Follow the prompts to set a password.
- Choose an export location.
- Complete the wizard to extract the private key.
Now, you’ve successfully extracted your private key within these Windows operating systems.
Mac OS X
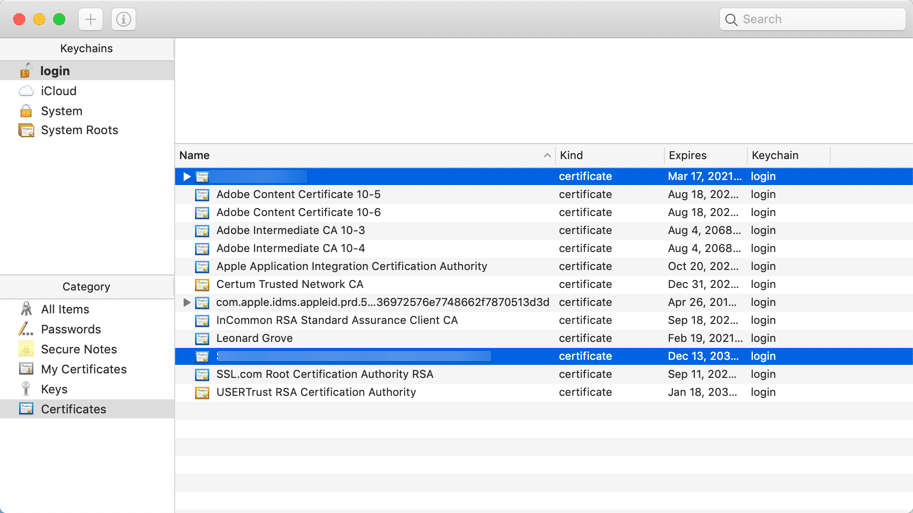
You can get the private key from a certificate via the built-in Keychain Access utility to manage your digital identities.
- Open the Keychain Access utility on your system.
- Navigate to the Certificates category in the left-hand column.
- Locate the certificate containing the private key you need.
- Expand the certificate by clicking the triangle beside its name.
- You’ll see the associated private key listed under the certificate.
- Right-click on the private key and select Export Items.
- Choose the file format; the most commonly used is the .p12 format.
- Choose a location to save the exported file.
- Enter a password when prompted. This password will be required when importing the private key.
- Click OK to complete the export process.
Tomcat
To extract the SSL certificate private key, you’ll need to access the Tomcat server’s certificate storage, typically located in the conf directory.
Use the keytool command-line utility, which comes bundled with Java, to export the private key into a separate file. Run the following command:
keytool -importkeystore -srckeystore your_keystore -destkeystore your_p12_file -deststoretype PKCS12
This command will convert the entire keystore to PKCS12 format, including the private key and the associated certificate.

If you want to extract only the private key and certificate in PEM format (commonly used with web servers like Apache or Nginx), you can use the openssl command in combination with keytool:
keytool -importkeystore -srckeystore your_keystore -destkeystore temp.p12 -deststoretype PKCS12 openssl pkcs12 -in temp.p12 -out your_key_and_cert.pem -nodes
This will create a PEM file (your_key_and_cert.pem) containing the private key and certificate.
cPanel
Here’s how to get your Private Key on cPanel:
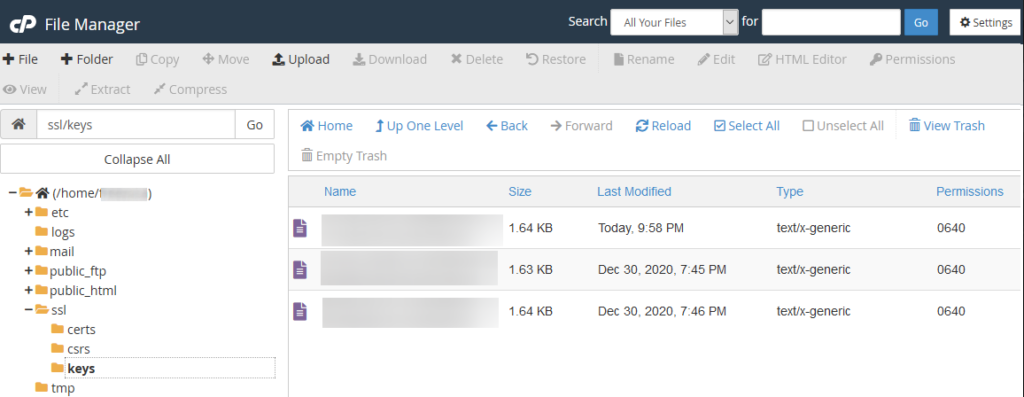
- Firstly, log into your cPanel account. Then, navigate to the Security section and click on SSL/TLS.
- Within this, you’ll find the Private Keys (KEY) option. Click on it. This is the private key file’s location.
- Next, you’ll see a list of keys. Find the one corresponding to your certificate and click View & Download.
- A new window will open with your private key. Save this key in a secure location, as it’s your ticket to decrypt information encrypted with your public key.
WHM
The exact steps and interface may vary slightly depending on the version of WHM you are using. Here is a detailed breakdown of how to retrieve a private key from a certificate in WHM:
- Open your web browser and navigate to the WHM login page. Enter your credentials to log in.
- Once logged in, find and click on the SSL/TLS option. It might be under the Security Center or a similar section, depending on your WHM version.
- Look for the SSL Storage Manager or a similar option within the SSL/TLS section.
- In the SSL Storage Manager, you’ll see a list of installed SSL certificates. Locate the certificate for which you want to retrieve the private key.
- Click on the name or details of the certificate to access more information.
- Look for a section labeled Private Keys (KEY) or something similar. It’s where the private key associated with the certificate is stored.
- The private key should be displayed in this section. Copy the private key to a secure location.
Plesk
Let’s now tackle the process of retrieving your private key from a certificate using Plesk.
- First, log into your Plesk control panel.
- Head to the Websites & Domains tab and find the domain you’re interested in.
- Click on SSL/TLS Certificates. Here, you’ll see a list of your SSL certificates.
- Select the certificate you need the private key for.
- Plesk will lead you to a new page detailing the certificate’s information.
- Under the Certificate section, there’s a field named Private Key.
- Simply click the Show button to reveal it.
Synology NAS DSM
Extracting your private key from a certificate using Synology NAS DSM, while slightly technical, isn’t overly complex.
- First, you’ll need to access the Synology NAS DSM interface. Then, locate the Certificate section under the Control Panel.
- Find the certificate you wish to extract the private key from. Click Configure, and then Export Certificate.
The system will download a .pem file containing your certificate and private key. Open this file using a text editor, and locate the section that begins with ‘—–BEGIN PRIVATE KEY—–‘.
This is your private key file. Remember, keep it safe – anyone with your private key can decrypt your secure data.
Webmin
As always, the exact steps may vary slightly depending on the version of Webmin and the specific module configurations. But, generally, here’s how to do it:
- Log in to your Webmin dashboard.
- Navigate to Webmin > Servers > Apache Webserver.
- Under Apache Webserver, click on Global Configuration.
- Within the Global Configuration page, look for an option related to SSL or SSL Options. The exact wording may vary depending on your Webmin version.
- Look for an option like Manage SSL Certificate or Configure SSL Certificate.
- You should see a section for the Current Certificate. Click on it to view the details.
- To extract the private key, there might be an option like Key Text or View Key. Click on it to display the private key in text form.
Now, you’ve learned another method of extracting private keys using Webmin.
VestaCP
Here are the instructions to get a private key from a certificate in the Vesta Control Panel (VestaCP):
- Log in to your Vesta Control Panel (VestaCP) account.
- Navigate to the Web section in the control panel.
- Select the specific domain for which you need to retrieve the private key.
- Look for an option like SSL Support or SSL Settings. Click on it to access the SSL configuration for the selected domain.
- Scroll down within the SSL configuration settings until you find the SSL Private Key section.
- In the SSL Private Key section, you should see the private key associated with the selected domain.
If there are variations in the interface due to updates or specific configurations, refer to the official VestaCP documentation for the most accurate and up-to-date information.
DirectAdmin
Here’s how to retrieve a private key in DirectAdmin:
- Log in to your DirectAdmin account.
- Navigate to the SSL Certificates section under the Advanced Features menu.
- Look for the specific certificate for the domain you’re interested in. The certificate and its corresponding private key are usually listed together.
- The private key is typically displayed in a text box below or near the certificate information.
If you prefer using the command line interface, here’s a more detailed guide:
- Connect to your server using SSH.
- Navigate to the directory where keys are stored. The path is often similar to ‘/usr/local/directadmin/data/users/your_user_name/domains/’.
- Look for the specific domain folder for which you want to retrieve the private key.
- Inside the domain folder, you should find files related to SSL, including the private key. The private key file often has a ‘.key’ extension.
Webuzo
In the Webuzo control panel, retrieving the private key from a certificate requires a few easy steps.
- Log into your Webuzo panel.
- Navigate to the Security section and click on SSL Certificates. There, you’ll see a list of your certificates.
- Find the one from which you need to extract the private key code. Click on the View button next to it.
- Now, you’ll see the certificate details. Look for the Private Key section. That’s where your private key code lies. Copy this code and save it securely.
CSR Generated via an Online Tool
You can also get the private key from a Certificate Signing Request (CSR) generated via an online tool.
You’ll first need to create your CSR code. Using an online CSR generator, input your company and domain details, then generate the CSR. Most online tools also create a private key during this process. Keep this private key safe, as the online tool doesn’t store it.
Once you’ve submitted your CSR to a Certificate Authority and received your certificate, your private key will match this certificate.
Bottom Line
Your SSL private key is a crucial component in securing your online data, generated alongside the CSR code during certificate enrollment requests. Should you lose or misplace it, you’ll need to create a new private key.
And, since you cannot create a private key from a certificate, if you misplace your SSL private key, you typically cannot recreate it from the certificate details. The usual course of action is to generate a new key pair and obtain a new SSL certificate. The new certificate will be associated with the new private key.
Save 10% on SSL Certificates when ordering from SSL Dragon today!
Fast issuance, strong encryption, 99.99% browser trust, dedicated support, and 25-day money-back guarantee. Coupon code: SAVE10