



Keychain Access is still on every Mac, and its Certificate Assistant still generates certificate signing requests. Whether that request is any use for code signing depends entirely on which certificate you are ordering. For an Apple Developer ID certificate, the one that lets you distribute Mac software outside the Mac App Store, Keychain Access is the correct tool and the steps below are current. For a commercial code signing certificate from a public Certificate Authority, the kind used to sign Windows executables, installers, drivers and Java applications, a request generated in Keychain Access has not been accepted since June 1, 2023, because the private key must now be created on hardware.
Work out which of the two you need first, then follow the matching section.
Which code signing certificate are you actually getting?
Both products are called code signing certificates and both prove who published a piece of software, but they come from different issuers and follow different rules. Readers land on this page because Apple and the public Certificate Authorities use the same words for two different things.
- Apple Developer ID certificate. Issued by Apple, under its own Developer ID Certification Authority, to members of the Apple Developer Program. It signs Mac apps, plug-ins and installer packages that you distribute yourself, so macOS Gatekeeper recognizes you as an identified developer. The key pair is generated on your Mac and stays in your login keychain, and you create the request in Keychain Access.
- Publicly trusted code signing certificate. Bought from a public Certificate Authority such as Sectigo, DigiCert or GlobalSign. It signs Windows executables, MSI installers, drivers, PowerShell scripts and Java applications. It is governed by the CA/Browser Forum Code Signing Baseline Requirements, which require the private key to be generated on and stay on certified hardware, so there is nothing for Keychain Access to do.
The short decision rule: if the software you are signing runs on macOS and you are shipping it outside the Mac App Store, you need a Developer ID certificate. If you are signing anything for Windows, or a Java application, you need a commercial code signing certificate, even if you build it on a Mac. Neither of these is an SSL/TLS certificate. If what you actually want is HTTPS on a Mac server, follow how to generate a CSR on macOS Servers instead.
The commercial route: why the Keychain method no longer applies
Since June 1, 2023, the CA/Browser Forum Code Signing Baseline Requirements have required the private key for every publicly trusted code signing certificate, standard (OV) and Extended Validation (EV) alike, to be generated and stored in a hardware crypto module that meets FIPS 140-2 Level 2, Common Criteria EAL4+, or an equivalent standard, and to be non-exportable. EV code signing always required hardware; the 2023 change extended the same rule to standard certificates.
A key created by Certificate Assistant fails that test by design, for three separate reasons:
- The key is exportable software key material. It is written into your login keychain, and you can select it and export it as a .p12 file. That portability is convenient for Apple development and is exactly the property the hardware requirement exists to remove.
- The key size does not line up. The Baseline Requirements set a minimum of RSA 3072 bits for code signing, and Certificate Assistant’s Key Size menu has no 3072 option.
- The request carries almost no identity. Certificate Assistant asks only for a Common Name and email addresses. There is nowhere to enter the organization, locality, state or country details that a Certificate Authority validates for an organization-validated code signing certificate.
That leaves two valid ways to get a publicly trusted code signing certificate, and which one you use is decided when you order:
- Token plus shipment. The Certificate Authority generates the key pair and the request on a certified USB token on its side, loads the issued certificate onto it, and mails you the token. There is no CSR for you to create or paste anywhere. See what code signing certificate delivery method to choose.
- Your own hardware token, HSM or cloud HSM, with attestation. You generate the key inside the device, produce the request there, and submit an attestation file proving the key was created on compliant hardware and cannot be exported. Follow the YubiKey 5 FIPS CSR generation and attestation guide or the Luna Network Attached HSM v7.x CSR and attestation guide, or your HSM vendor’s own documentation.
One more change that has already taken effect: ballot CSC-31 cut the maximum validity of publicly trusted code signing certificates from 39 months to 460 days for certificates issued from March 1, 2026 onward, so renewals now come round roughly every 15 months. For the wider picture, see how to generate a CSR for a code signing certificate and the OpenSSL version of the same guide.
Generate the CSR in Keychain Access for an Apple Developer ID certificate
If you already saved a .certSigningRequest file, skip ahead to submitting it in your developer account.
Two things to check before you start. You need an Apple Developer Program membership, and Apple requires the Account Holder role to create a Developer ID certificate. You are also allowed up to five Developer ID Application certificates and five Developer ID Installer certificates per team. The portal asks you to upload a request every time you create a certificate, so run through this process once per certificate.
Step 1: Open Keychain Access and start the request
Keychain Access is no longer where most tutorials say it is. Up to macOS Sonoma it lived in Applications > Utilities. From macOS Sequoia onward, Apple moved it into /System/Library/CoreServices/Applications/, a system folder that Finder does not show when you browse Applications, so looking under Utilities now turns up nothing. The quickest ways to open it are Spotlight (press Command-Space and type Keychain Access), or a single command in Terminal:
open "/System/Library/CoreServices/Applications/Keychain Access.app"With the app open, choose Keychain Access > Certificate Assistant > Request a Certificate From a Certificate Authority in the menu bar.
Before you do, click an empty area of the item list so that nothing is selected. If a key or certificate is highlighted, the menu item changes to Request a Certificate From a Certificate Authority With followed by that item’s name, and it builds the request around the existing key instead of creating a new pair. That is useful when you deliberately want to reuse a key, and confusing when you do not.
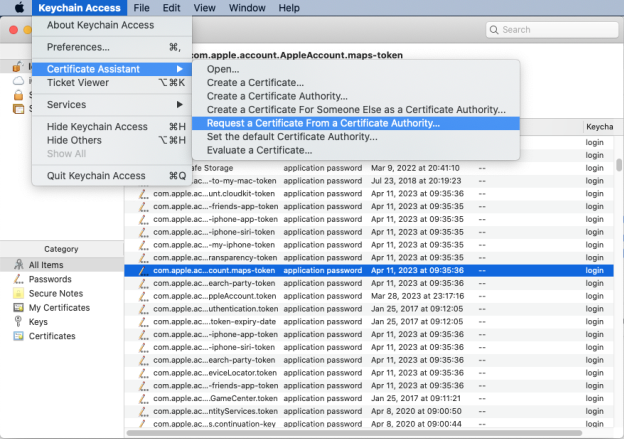
Step 2: Fill in the Certificate Information window
Certificate Assistant opens on a pane titled Certificate Information. It asks for very little:
- User Email Address: the email address on your Apple Developer account.
- Common Name: a label for the key pair, for example Developer ID Application Key. This is not the name that ends up in the certificate. Apple builds the issued certificate’s subject from your team, in the form Developer ID Application: Your Team Name (TEAMID), so treat this field as your own reference.
- CA Email Address: leave it empty. It is only used by the other delivery option.
- Request is: select Saved to disk, not Emailed to the CA. Apple’s developer portal takes an uploaded file.
If you also want to choose the key size or algorithm, tick Let me specify key pair information here. Then click Continue.
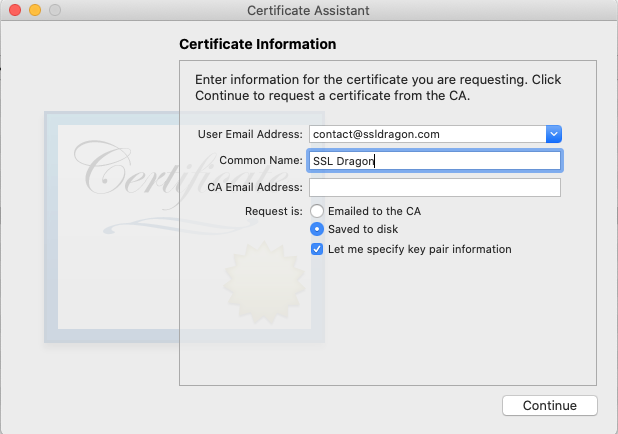
Step 3: Choose the key pair settings, if you need to
This pane appears only if you ticked the box in step 2, and for a Developer ID certificate you can normally skip it. The defaults are RSA at 2048 bits, which is what Apple’s own instructions use. With RSA selected, the Key Size menu offers 2048, 4096 and 8192 bits. The Algorithm menu offers RSA and ECC, and switching to ECC replaces those sizes with 256, 384 and 521 bits. Leave the algorithm on RSA unless the service you are enrolling with specifically asks for an elliptic curve key.
Earlier versions of this guide told you to select at least 3072 bits at this point. That figure is the CA/Browser Forum minimum for commercial code signing certificates. It does not apply to Developer ID, and it is not offered in this menu, so there is nothing to select. Click Continue.
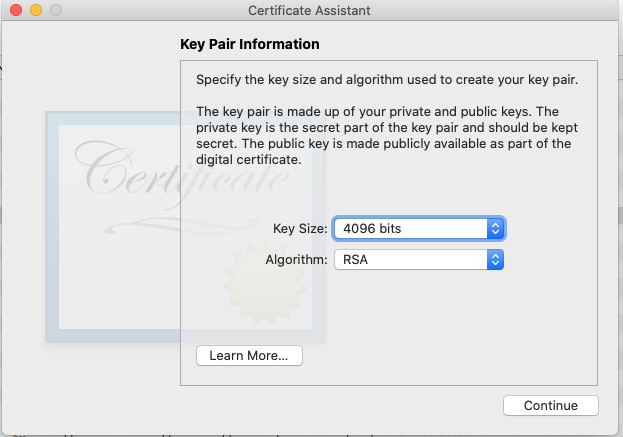
Step 4: Save the request and check what is in it
Choose where to save the file and click Save. You get a file with the .certSigningRequest extension, and Certificate Assistant also puts the matching key pair into your login keychain. The file itself is ordinary PEM text, so you can open it in TextEdit and read it, though the encoded block will not tell you much on its own.
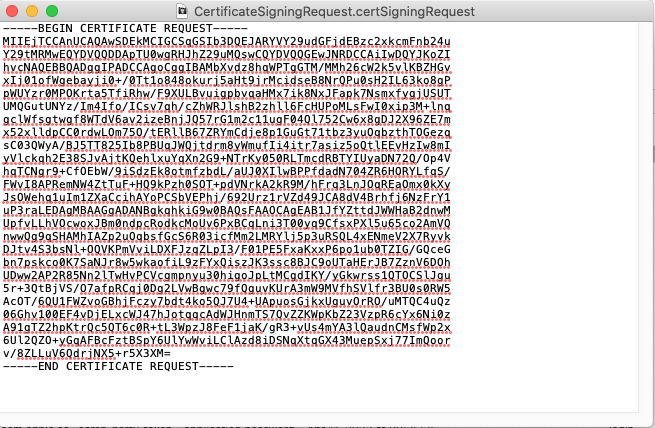
To confirm the details before you upload it, decode the request in Terminal. This works with the openssl command already on macOS, which is LibreSSL rather than OpenSSL proper, so there is nothing to install:
openssl req -noout -text -in CertificateSigningRequest.certSigningRequestCheck three things in the output: the Subject line shows the Common Name and email address you typed, the public key line reports 2048 bit (or whatever size you chose), and the signature algorithm is SHA-256. If you would rather not use Terminal, paste the file’s contents into our CSR decoder to read the same fields.
Step 5: Submit the request and install the certificate
Sign in to your Apple Developer account and open Certificates, Identifiers & Profiles. Click Certificates in the sidebar, then the add button, and under Software select Developer ID. Pick the type you need:
- Developer ID Application signs a Mac app, plug-in or bundle.
- Developer ID Installer signs a Mac installer package containing your signed app.
Click Continue, then Choose File, select your .certSigningRequest file, click Continue again, and click Download. Apple returns a certificate file with a .cer extension. Double-click it to install it, and it appears in Keychain Access under My Certificates, paired with the private key created in step 4.
Signing with the certificate is only half of what macOS checks. Gatekeeper expects software downloaded from outside the Mac App Store to be signed with a Developer ID certificate and notarized by Apple, so submit the signed build for notarization before you distribute it. Notarization does not replace the signature, it runs on top of it.
Find the private key and back it up
The certificate is worthless without the private key Certificate Assistant generated, and that key exists in exactly one place until you copy it. To find it, open Keychain Access, select the login keychain, then the Keys category, and look for the Common Name you typed in step 2. You will see two entries under that name, a public key and a private key. Note that the public key is not your CSR: the CSR is the .certSigningRequest file you saved to disk.
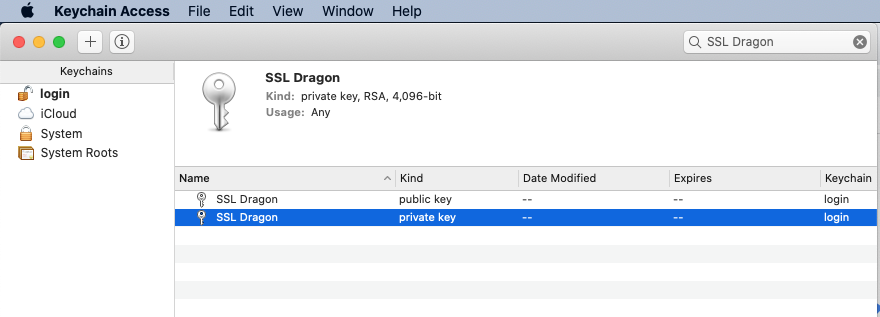
Once the .cer file is installed, look under My Certificates instead. There the certificate and its private key appear as a single entry, which is the signing identity that codesign, Xcode and your build scripts use. To move that identity to another Mac or to a build server, right-click the entry and choose Export, which produces a .p12 file protected by a password you set. Store that file the way you would store any signing key, because anyone who has it and the password can sign software under your name.
Back it up before you need it. Developer ID certificates are valid for five years and cannot be renewed: when one expires you create a replacement. If you lose the private key, the certificate can never be used again and you have to create another, which uses up one of your five Developer ID Application or five Developer ID Installer slots. Resist the urge to revoke the dead one to tidy up. Apple is explicit that an app signed with a revoked Developer ID certificate will not install, and will not launch for a user who already has it, so revoking would break every copy already out there. Revoke only if the key was actually stolen, and go in expecting that breakage.
One piece of housekeeping for anyone who arrived here for a commercial certificate: if you already generated a key pair in Keychain Access for a public Certificate Authority order, it cannot be used and no CA will accept it. Nothing breaks if you leave it in place, but there is little reason to keep exportable signing key material sitting in a keychain. Select both the public and the private key under Keys and delete them, then order through a token or an HSM instead.
Frequently Asked Questions
For an Apple Developer ID certificate, yes, and it is the method Apple documents. For a publicly trusted code signing certificate from a commercial Certificate Authority, no. Since June 1, 2023 those private keys have to be generated and stored on a hardware crypto module meeting FIPS 140-2 Level 2, Common Criteria EAL4+, or an equivalent standard, and a key created in Keychain Access is exportable software key material.
In /System/Library/CoreServices/Applications/. Apple moved it there in macOS Sequoia, so it is no longer in Applications > Utilities and does not appear when you browse Applications in Finder. Open it with Spotlight, or run open "/System/Library/CoreServices/Applications/Keychain Access.app" in Terminal. The separate Passwords app introduced alongside it handles passwords only, not certificates and keys.
RSA 2048 bits for a Developer ID certificate, which is the default, so you can leave Let me specify key pair information unticked. With RSA selected, the Key Size menu offers 2048, 4096 and 8192 bits, and switching to ECC replaces those with 256, 384 and 521 bits. At no setting does it offer 3072 bits, which is the CA/Browser Forum minimum for commercial code signing certificates, and that is one of several reasons this route does not fit a commercial order.
Because the request it builds carries only a Common Name and email addresses. Apple does not need more: it fills in the subject of a Developer ID certificate from your developer account. A commercial Certificate Authority does need organization details, and validates them against public records, which is another reason a Keychain request is the wrong shape for that order.
No. The CA/Browser Forum hardware rule applies to publicly trusted code signing certificates issued by commercial Certificate Authorities. Developer ID certificates are issued by Apple’s own certificate authority to Apple Developer Program members, and the key is generated in your login keychain by Certificate Assistant, exactly as described above.
Generate one for each. The developer portal asks you to upload a certificate signing request at every certificate creation, and giving each identity its own key pair means that replacing or revoking one of them leaves software signed with the other untouched. Give each request a Common Name you can tell apart in Keychain Access later.
Check the Keys category of the login keychain, searching for the Common Name you typed rather than the file name. If it is genuinely absent, the usual causes are that the key pair was created on a different Mac or under a different user account, that the keychain item was deleted, or that the request was built from an existing key with the Request a Certificate From a Certificate Authority With variant of the menu item. Without the private key the request cannot be used, so generate a new one.
Publicly trusted code signing certificates issued from March 1, 2026 onward are capped at 460 days, reduced from 39 months by CA/Browser Forum ballot CSC-31. Apple Developer ID certificates are valid for five years and are replaced rather than renewed. In both cases, software you signed while the certificate was valid keeps working after it expires, provided the signature was timestamped. Apple applies one exception: it checks the Developer ID Installer certificate at the moment an installer package runs, so a .pkg has to be re-signed once that certificate expires, even though the app inside it is unaffected.
For related reading, see our code signing tutorials, the other ways to generate a CSR, and how to sign an EXE file using a code signing certificate.
Save 10% on SSL Certificates when ordering from SSL Dragon today!
Fast issuance, strong encryption, 99.99% browser trust, dedicated support, and 25-day money-back guarantee. Coupon code: SAVE10



