
Important Update!
Starting from June 1st, 2023, a new security measure is in place for code signing certificates. All code signing certificates must now be stored on hardware meeting specific security standards such as FIPS 140 Level 2, Common Criteria EAL 4+, or their equivalents.
As a result, the process of obtaining and installing certificates has changed. Certificate Authorities no longer support browser-based key generation, creating CSRs, and installing certificates on laptops or servers. Instead, if you opt for token + shipment as your code signing delivery method, the CA will handle CSR generation. Alternatively, if you prefer to use your Hardware Security Module (HSM), check the guides below or follow your HSM provider’s instructions for CSR generation.
- YubiKey 5 FIPS CSR Generation and Attestation
- Luna Network Attached HSM v7.x: CSR & Attestation Guide
The following text contains outdated information, no longer applicable to CSR generation for code signing certificates.
In this guide, we will walk you through the process of generating a Certificate Signing Request for code signing certificates via MMC on Microsoft Windows. If you encounter any difficulties while following these steps, we recommend reaching out to Microsoft Support for further assistance.
Please keep in mind that generating a CSR involves creating a unique key pair for your Windows computer. It is crucial to keep safe both the public and private key files. Losing either of them will result in a mismatch between your Code Signing certificate and the key pair. In such a case, you will have to replace the certificate with a new one.
Generate a CSR for a Code Signing Certificate via MMC
By carefully following the instructions below, you can ensure a seamless generation of your CSR and maintain the integrity of your certificates.
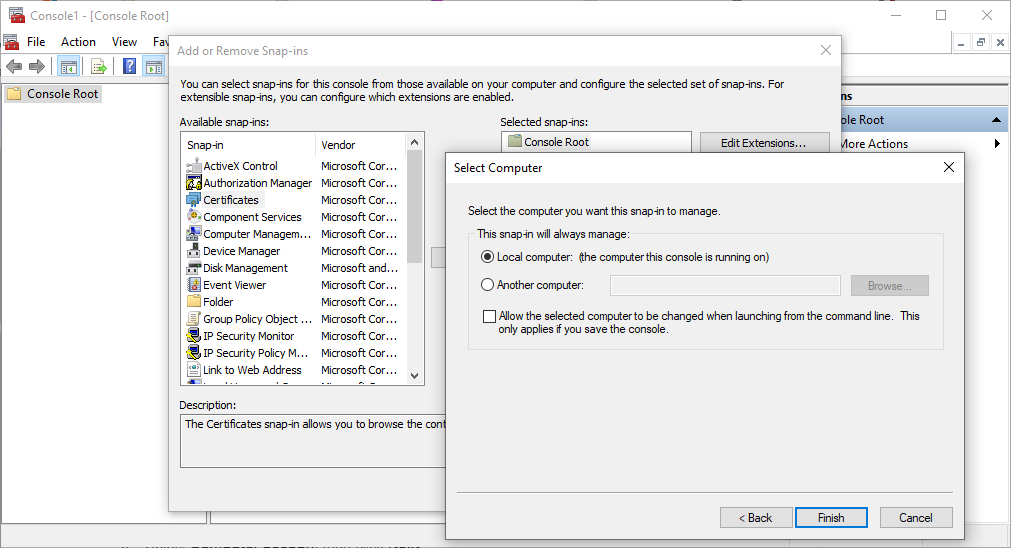
Step 1. Add a Snap-In in MMC
- On your Windows device, click Start.
- In the Search programs and files field, type: mmc
- Click File then Add/Remove Snap-in.
- From the list of available snap-ins, choose Certificates and click Add.
- Select Computer account then click Next.
- Select Local computer (the computer this console is running on) and click Finish.
- In the Add/Remove Snap-in window, click OK.
- Save these console settings for future use.
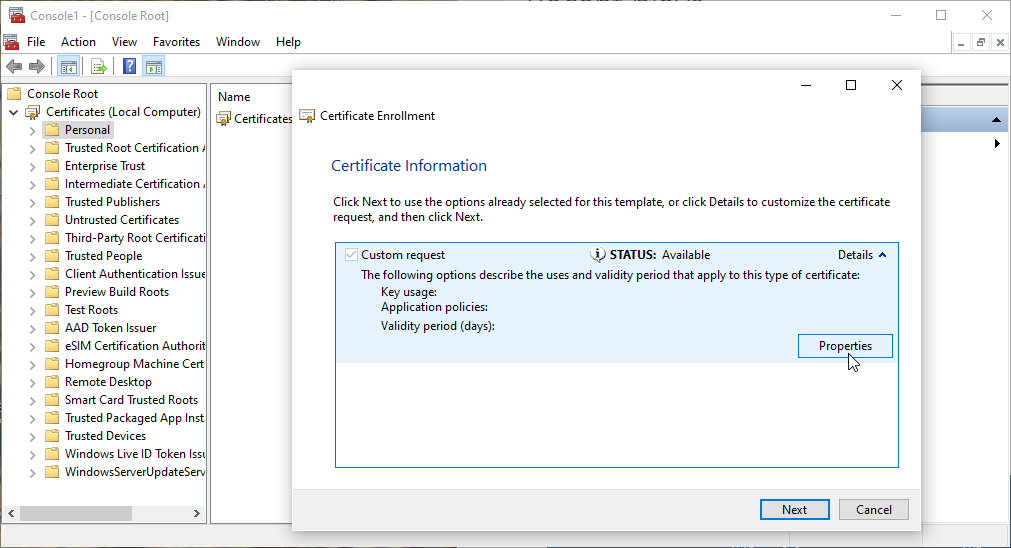
Step 2. Initiate Certificate Enrollment
- Go to your MMC snap in then right-click the Personal folder.
- Select All Tasks > Advanced Operations > Create Custom Request.
- In the CSR generation wizard click Next.
- Select Proceed without enrollment policy then click Next.
- At the PKCS # 10 window click Next.
- Select Properties from the Details drop-down menu
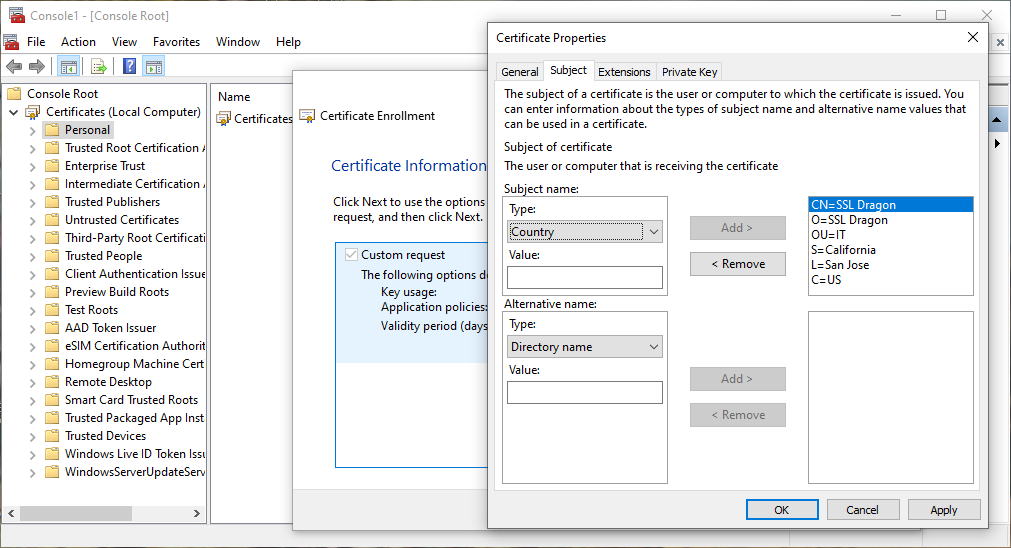
Step 3. Provide the Required Information
- Enter a Friendly Name of your preference.
- Select the Subject tab and in the Subject name: Type: field add the following name values required for your CSR generation (CN, O, OU, S, L, and C).
- CN stands for Common Name – The registered organizational name or the individual’s full name that the certificate will be issued to.
- O stands for Organization – The registered organizational name to which the certificate belongs. If the company or department name contains special characters such as &, @, or any other symbol requiring the use of the shift key, please spell out the symbol or omit it when enrolling for the certificate. For instance, if the name is “AB & C Corporation,” it should be entered as “ABC Corporation” or “AB and C Corporation.”
- OU stands for Organizational Unit -The department within the organization in charge of the certificate enrollment.
- S stands for State – The state or province where the organization is registered. Do not abbreviate the state or province name, for example, Florida, not FL.
- L stands for Locality – The city where the company is registered.
- C – stands for Country – The two-letter country code where the company is registered.
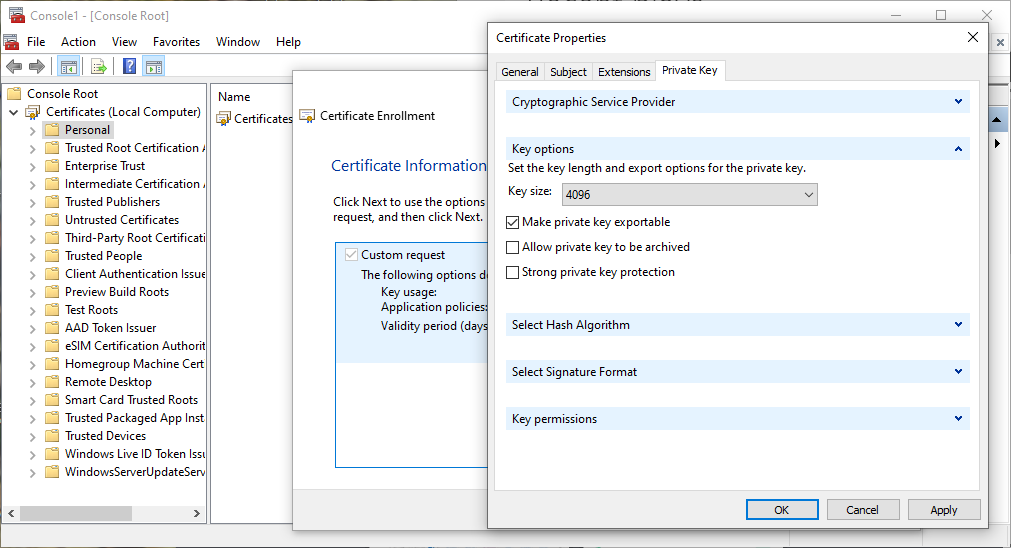
Step 4. Select the Private Key Size and Hash Algorithm
- Click the Private Key tab then click the drop-down for Key options and select the Key size, then check the option to Make private key exportable and click OK.
- Note: All Code Signing certificates must have a 3072-bit or 4096-bit key size.
- Click the drop-down for Select Hash Algorithm, under Hash Algorithm select sha256 and Click OK.
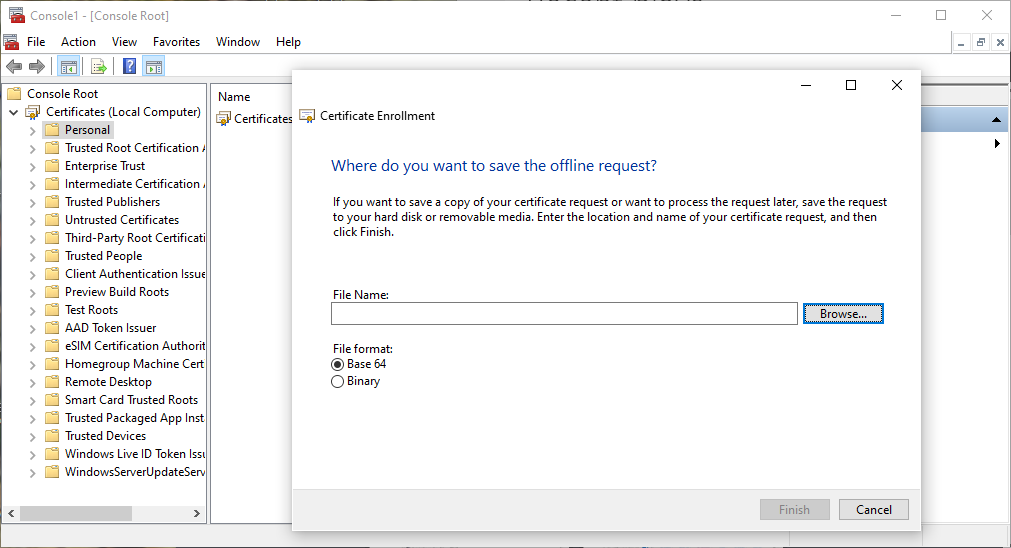
Step 5. Save Your CSR File
- Click Next then Click Browse.
- Save the CSR file in a preferred location. Enter a name for the file, click Save, and then Finish.
- You will find the CSR file at your saved location. You can use it to request your code signing certificate. By default, Windows saves it in C:\Windows\System32
Final Step
After you submit the CSR code to the CA and pass the validation, the Certificate Authority will issue you the code signing cert, and you’ll be able to sign your software with it.
Save 10% on SSL Certificates when ordering from SSL Dragon today!
Fast issuance, strong encryption, 99.99% browser trust, dedicated support, and 25-day money-back guarantee. Coupon code: SAVE10
