After you install WordPress on a fresh site, the next step is to add a WordPress SSL certificate. If you skip this phase, browsers will flag your website as “not secure,” and visitors won’t be able to access it.
But what is an SSL certificate for WordPress, and how do you get one? Stay tuned as we guide you through how to install an SSL certificate in WordPress and configure it properly to avoid potential issues.
Table of Contents
- What is an SSL Certificate for WordPress?
- Why Do You Need a WordPress SSL Certificate?
- How to Get an SSL Certificate for WordPress?
- How to Install an SSL Certificate in WordPress?
- Common WordPress SSL Issues
Save 10% on SSL Certificates when ordering from SSL Dragon today!
Fast issuance, strong encryption, 99.99% browser trust, dedicated support, and 25-day money-back guarantee. Coupon code: SAVE10

What is an SSL Certificate for WordPress?
An SSL certificate for WordPress serves as a digital security ID for your website. It encrypts the data transmitted between your visitors’ web browsers and your WordPress site’s server, ensuring that sensitive information like passwords and payment details remains confidential.
It also tells visitors that your site is secure by displaying a padlock or information icon in their browser’s address bar. Moreover, SSL certificates are now a mandatory standard for all websites, including those built on WordPress, to meet security requirements and maintain accessibility.
SSL stands for Secure Sockets Layer. In simpler terms, it’s a technology that secures connection between a user’s web browser and the website they’re visiting. This security is essential, especially when users constantly share sensitive information over the Web.
The SSL encryption scrambles the information, making it unreadable to anyone trying to intercept it. As a result, sensitive data remains private and secure. But why is this important for WordPress users?
Why Do You Need a WordPress SSL Certificate?
Beyond just securing data, SSL certificates also contribute to trust and credibility. Search engines like Google now require all websites to have SSL certificates. While having an SSL cert won’t directly boost your WordPress site’s search engine rankings, you must meet this condition to keep your site visible and accessible to users.
SSL certificates maintain compliance with industry regulations and standards. Whether it’s the strict requirements of GDPR for data protection or the security mandates of PCI DSS for e-commerce transactions, HTTPS encryption is a non-negotiable component of regulatory compliance.
Moreover, SSL certificates protect against man-in-the-middle attacks. With cyber-attacks becoming increasingly sophisticated, encrypting data transmissions via SSL helps reduce the risk of interception or tampering, ensuring the integrity and confidentiality of sensitive information.
So, whether your WordPress website is a blog or a large e-commerce platform, you must add SSL to WordPress. Here’s how to do it quickly.
How to Get an SSL Certificate for WordPress?
Getting an SSL certificate for your WordPress site involves a few technical steps, but don’t worry, we’ll walk you through the process. It all starts with identifying your specific needs.
There are several types of SSL certificates, each offering a different level of security. Depending on your website’s niche, you can choose from Domain Validation (DV), Organization Validation (OV), or Extended Validation (EV) certificates.
Next, you can buy a certificate from a commercial Certificate Authority or get a free one. Below, we compare the two options:
Buy an SSL Certificate from a Certificate Authority
When buying an SSL certificate for your WordPress website, there are a few key factors to consider. First and foremost is the choice of a reputable Certificate Authority. Look for one with a solid reputation for providing secure certificates at reasonable prices. At SSL Dragon, we’ve teamed up with the best CAs in the industry to offer you cheap WordPress certificates for any need.
Once you’ve selected a CA, the next step is to generate a Certificate Signing Request (CSR). It’s a piece of encrypted text containing information about your website and business that the CA will use to verify your identity. You can create the CSR with our CSR generator tool.
You’ll need to send the CSR to your CA for validation. The CA must verify the domain ownership for which you request the certificate. After completing the purchase, the CA will issue your SSL certificate.
Get a Free SSL Certificate for WordPress
Free SSL certificates are a viable option for WordPress sites that don’t belong to a legally registered company or don’t collect sensitive data. So, if you’re running a blog, a portfolio, or a small business website that doesn’t handle payments, you can opt for them instead.
It’s worth mentioning that free certificates offer entry-level features and may not be suitable for more complex sites. Here’s where you can get them:
Let’s Encrypt
Let’s Encrypt offers a basic WordPress certificate to ensure your visitors’ data remains safe and your site is accessible. Getting started is straightforward: first, check if your hosting provider supports Let’s Encrypt. Many popular hosts offer seamless integration, making the process even easier.
If you’re running your WordPress website on a self-managed server, you can still obtain a free SSL certificate from Let’s Encrypt. You’ll need to install Certbot, an open-source tool by Let’s Encrypt that automates the certificate issuance and renewal process. Certbot is available for various operating systems, including Linux, macOS, and Windows.
The process involves running a series of commands in the terminal or command prompt, which Certbot guides you through. These commands will prompt Certbot to verify your domain ownership and then fetch and install the SSL certificate on your server.
As you can see, this is quite technical, and for most owners, a far easier option is to get a hosting provider that offers free AutoSSL or Let’s Encrypt certs.
Your Hosting Provider
If your hosting provider supports Let’s Encrypt, enabling the SSL certificate is typically a few clicks away. Once logged into your hosting account, navigate to the SSL/TLS section. Here, you’ll find an option to install Let’s Encrypt certificates.
Select your domain, and the hosting provider will handle the rest, automatically configuring and renewing the certificate. This hands-off approach means you can focus on creating content without worrying about security issues or manual certificate management.
Be aware that the certificate activation may not be immediate due to factors like domain propagation or server configurations. While this delay is usually minimal, you might not see instant results. However, once activated, the hosting provider automates configuration and renewal.
Save 10% on SSL Certificates when ordering from SSL Dragon today!
Fast issuance, strong encryption, 99.99% browser trust, dedicated support, and 25-day money-back guarantee. Coupon code: SAVE10
How to Install an SSL Certificate in WordPress
Let’s break down the steps for installing an SSL certificate in WordPress using cPanel, a WordPress SSL plugin like Really Simple SSL, and doing it manually:
Install WordPress SSL Certificate via cPanel
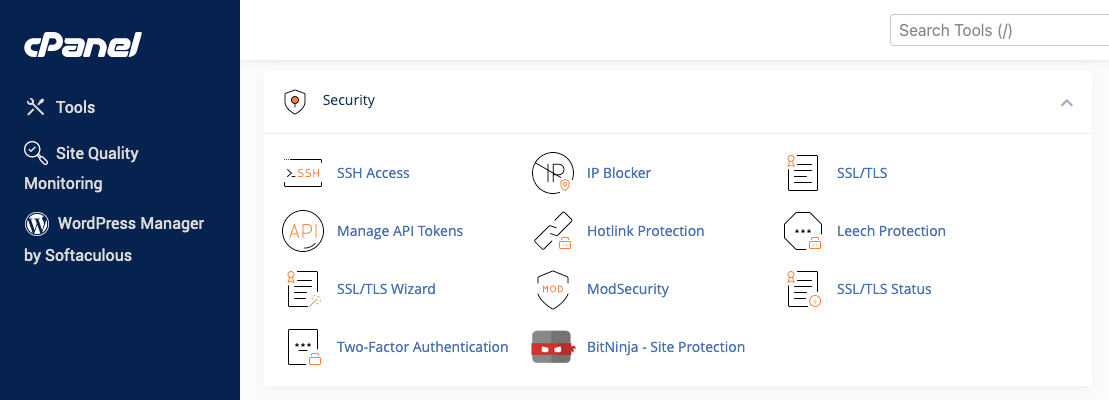
- Log in to cPanel: Go to your web hosting provider’s website and log in to your cPanel account using your credentials.
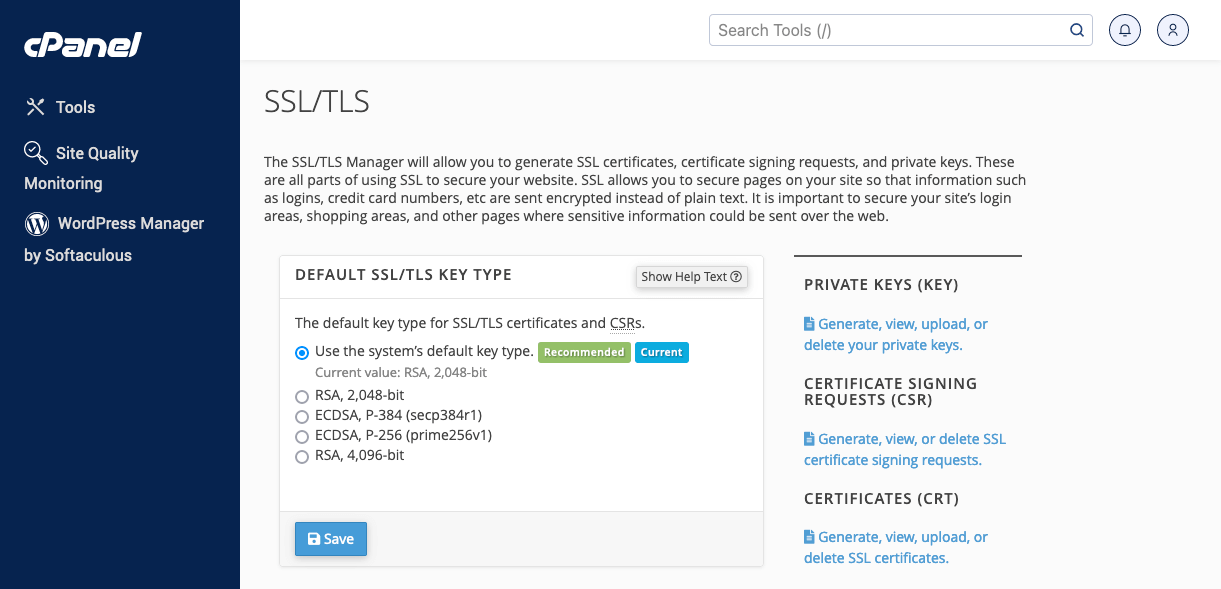
- Locate SSL/TLS Manager: In the cPanel dashboard, find the “SSL/TLS Manager” under the “Security” section.

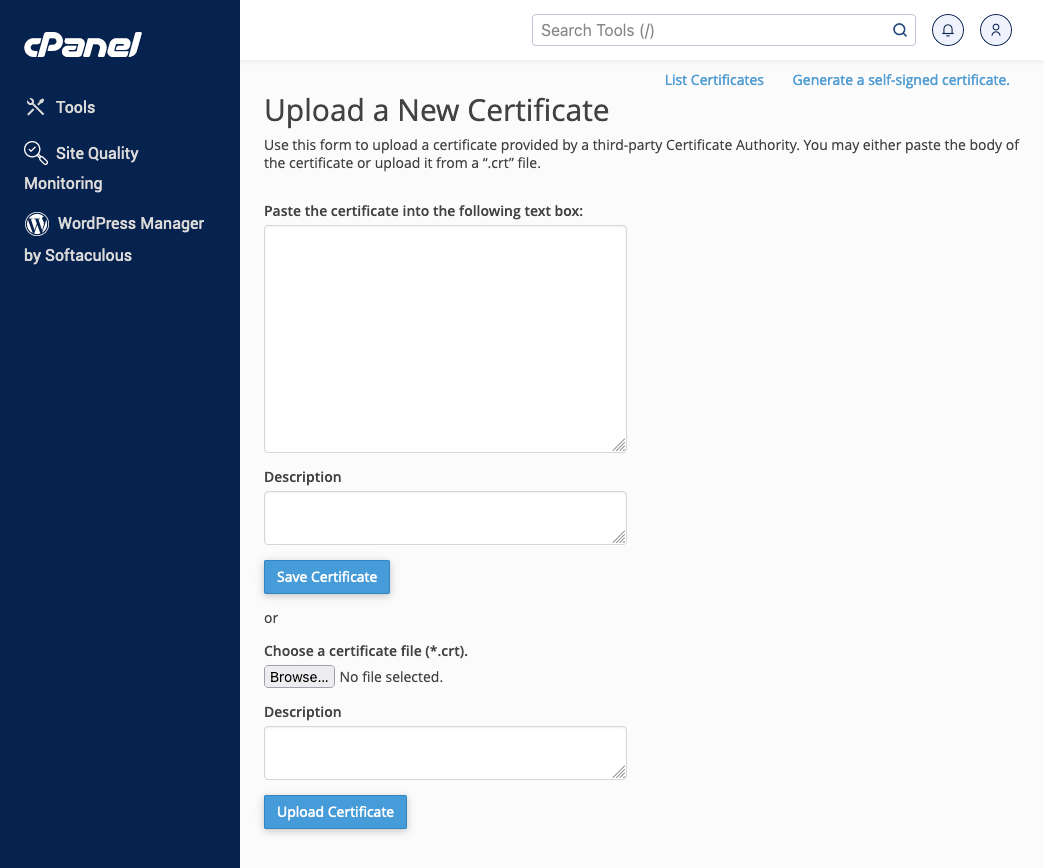
- Upload SSL Certificate: Locate the “Certificates (CRT)” section.

Upload the SSL certificate file (usually named something like yourdomain.crt) that you received from your SSL provider.
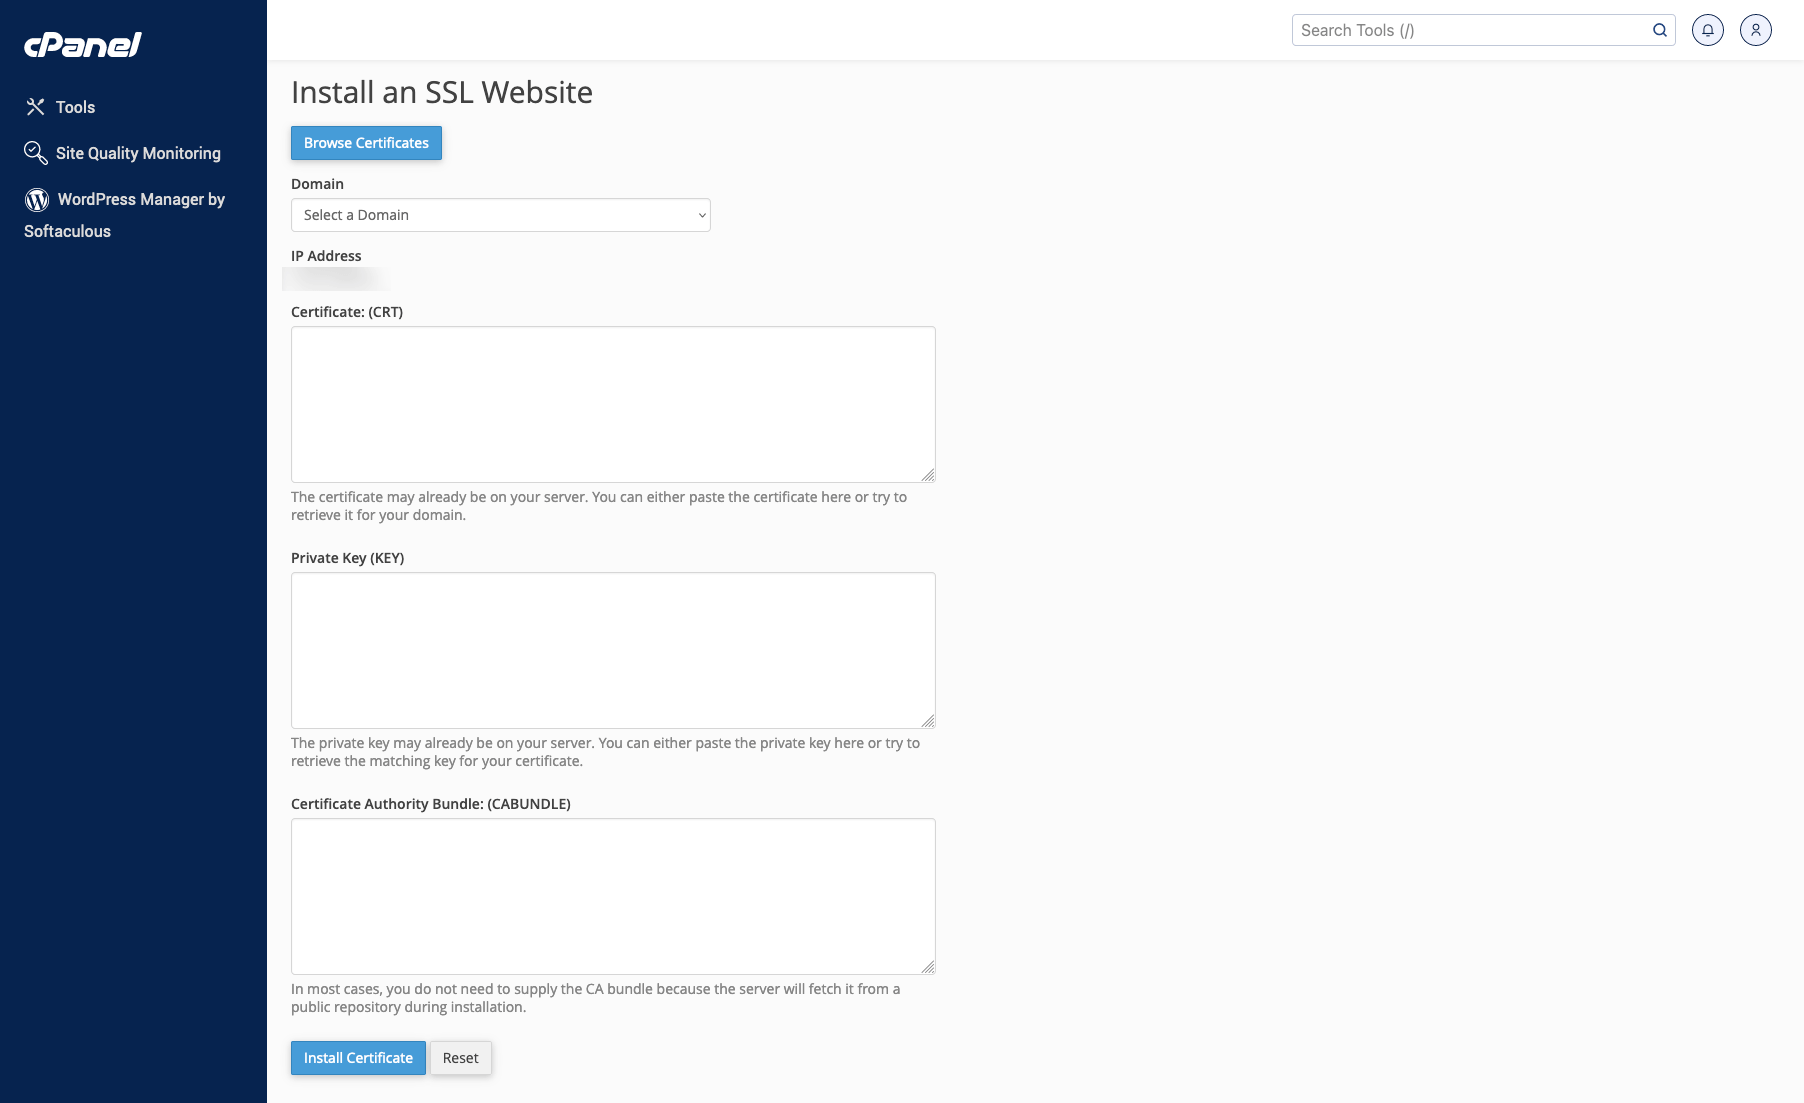
- Install Certificate: Return to the SSL/TLS Manager main page once uploaded.
Click “Manage SSL sites.” under “Install and Manage SSL for your site (HTTPS).”
Select your domain from the dropdown menu, then click “Autofill by domain” to fill in the certificate and private key fields.
Finally, click “Install Certificate.” - Verify Installation: After installing the certificate, visit your website using “https://” to ensure the SSL certificate is installed correctly.
Please note the description may vary slightly depending on your version of cPanel. For more thorough instructions, check our cPanel SSL certificate installation guide.
Using a WordPress SSL Plugin like Really Simple SSL
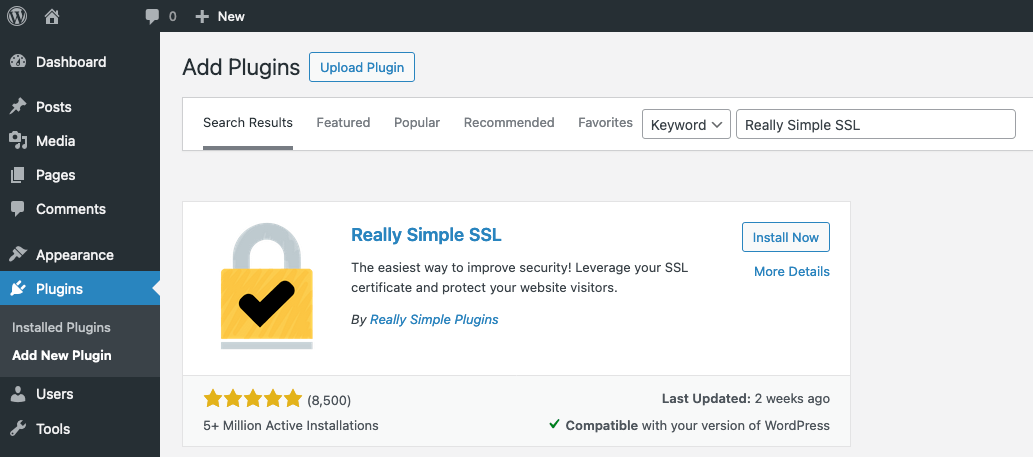
- Install the Really Simple SSL WordPress plugin: In your WordPress dashboard, go to “Plugins” > “Add New Plugin.” Search for “Really Simple SSL” and install it. Activate the plugin.

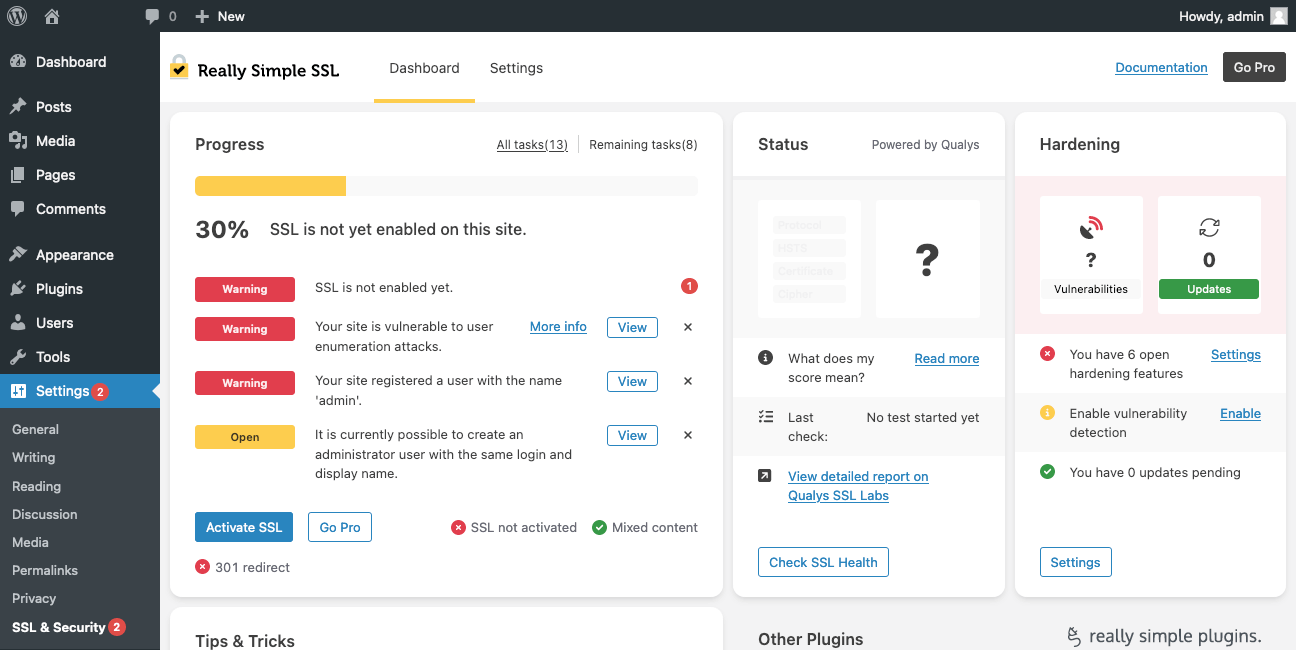
- Activate or Install SSL: Once activated, Really Simple SSL automatically detects your SSL certificate and configures your website to use HTTPS. If you don’t have a cert, you can generate one in the plugin. Depending on your hosting provider, the plugin can also install it for you or assist with instructions.

- Check SSL Activation: Visit your website using “https://” to ensure the SSL certificate is activated and working properly.
Manual SSL Installation
The thing about SSL certificate installation is that there isn’t a universal way to add them to your server. Each platform has its own policies and guides regarding SSL. We’ve written over 80 SSL installation tutorials that cover most of the servers, so if you host your WordPress site on one of them, check our instructions. Below is a simplified version of how you can do it manually. Please note that it may not work for all servers.
- Access Hosting Account: Log in to your hosting account, usually through cPanel or your hosting provider’s dashboard.
- Locate File Manager: Find and open the “File Manager” in your hosting account. It allows you to access your website files.
- Upload Certificate Files: Look for a folder named “SSL” or “SSL Certificates” in your hosting account’s file manager. Upload your SSL certificate files (usually .crt or .pem format) and the private key file (.key).
How to Configure WordPress to Use HTTPS
Once you’ve installed the SSL certificate on your WordPress site, follow the steps below to configure it to use HTTPS. Don’t neglect them, as they’re critical to your website security and SEO.
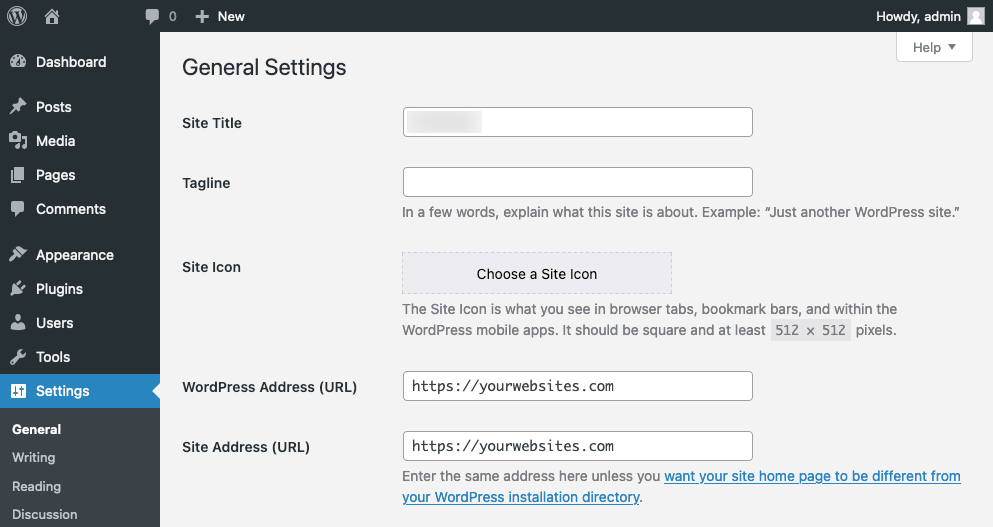
- Update URLs: In WordPress settings (Settings > General), change both WordPress Address (URL) and Site Address (URL) to start with “https://”.

- Replace HTTP Links: Use a plugin like Better Search Replace to update all HTTP links in your content and database to HTTPS.
- Update Theme and Plugin Assets: Ensure all external assets in themes and plugins (like stylesheets, scripts, and images) are loaded securely with HTTPS.
- Update .htaccess: Add a rewrite rule to force HTTPS in your .htaccess file. To access the .htaccess file, navigate to the root directory of your WordPress installation using an FTP client or file manager provided by your hosting provider.
RewriteEngine On RewriteCond %{HTTPS} off RewriteRule ^
https://%{HTTP_HOST}%{REQUEST_URI} [L,R=301] - Update Search Console and Webmaster Tools: Add HTTPS version as a new property in Google Search Console and Bing Webmaster Tools, and submit a new sitemap.
- CDN and Caching: Update CDN URLs to HTTPS and ensure caching plugins are configured for HTTPS.
- Test: Check your website to ensure all pages load securely with HTTPS.
- Monitor: Keep an eye on your site for any issues post-switch, including SEO impacts.
Common WordPress SSL Issues
Even after you install and configure your SSL certificate, you might encounter some common WordPress SSL issues like mixed content errors or improper SSL certificate configuration. Problems with insecure SSL/TLS protocols or ciphers, incorrect site URL settings, or erroneous redirects can also pop up, causing website outages.
- Mixed Content: Mixed content errors happen when your pages have both secure (HTTPS) and non-secure (HTTP) links. To resolve this problem, make sure all content loads over HTTPS. You can use the Really Simple SSL or SSL Insecure Content Fixer plugins to fix these errors automatically. Additionally, check your theme files and database for HTTP URLs and replace them with HTTPS.
- SSL Certificate Misconfiguration: When SSL certificates aren’t set up correctly for your WordPress site, it can leave your site insecure. You might see all kinds of SSL errors when accessing the site. You’ll need to review your SSL certificate installation process to fix this. Make sure you’ve followed all the steps correctly without skipping any. If you’re still having trouble, consider seeking help from an SSL specialist or your hosting provider.
- Insecure SSL/TLS Protocols or Ciphers Enabled: In modern environments, having insecure SSL/TLS protocols or ciphers enabled on a WordPress site is less common, especially on up-to-date servers with advanced security that support only TLS 1.2 and 1.3 protocols. However, this problem can still occur on legacy systems. While it may seem complex, tools like our free SSL checker can help identify weak protocols or ciphers. Once identified, you must adjust your server’s SSL/TLS settings accordingly.
- Incorrect Site URL Settings: Incorrect site URL settings in WordPress, particularly if they include mismatched protocols (HTTP vs HTTPS), can lead to SSL certificate errors. When users access a WordPress site, their browser verifies the SSL certificate to ensure a secure connection. If the site URL settings don’t match the protocol configured in the SSL certificate (e.g., if the certificate is for HTTPS but the site is loading over HTTP), the browser will display warnings about insecure connections.
- Redirect Loops or Incorrect Redirects: A redirect loop occurs when there’s a continuous cycle of redirects between your website’s HTTP and HTTPS versions. This commonly happens due to conflicting configurations in your server or WordPress settings. Essentially, your site keeps bouncing between HTTP and HTTPS protocols, unable to settle on one. To resolve this, you must access your site’s .htaccess file and remove any conflicting rules, ensuring a smooth transition between HTTP and HTTPS versions.
Bottom Line
A WordPress SSL certificate is a mandatory element of your website, regardless of size and niche. It may be a blog or an e-commerce store, but it must be over HTTPS for security and SEO purposes.
With SSL on WordPress, data transmission between users and servers is encrypted, minimizing the risk of unauthorized access and interception, enhancing security, and improving the website’s credibility and accessibility via search engines.
It’s your responsibility as a website owner to install and configure the certificate correctly so that you don’t face sudden SSL certificate errors that may drive visitors away.
Save 10% on SSL Certificates when ordering from SSL Dragon today!
Fast issuance, strong encryption, 99.99% browser trust, dedicated support, and 25-day money-back guarantee. Coupon code: SAVE10